A drop shadow is one of the fastest ways to make text, logos, and other objects feel like they're actually in the scene, not just stuck on top of it. The best way to do this is with the non-destructive Drop Shadow effect inside Photoshop's Layer Style options. This keeps your work flexible and gives you total control, without ever permanently altering your original layer.
Your Quick Guide to Creating a Drop Shadow
Ever look at a design and feel like it’s just… flat? A good drop shadow is often the missing ingredient. It adds that crucial sense of depth and realism, making your key elements pop right off the canvas. The effect works by mimicking how an object would cast a shadow from a light source, creating instant separation between layers.
The key is to always use Photoshop's Layer Styles. This approach is completely non-destructive, which means your original layer stays untouched and you can go back and tweak the shadow as much as you want.
This little effect has been a workhorse for designers since it first appeared in Photoshop 5.0 way back in 1998. That release introduced the Layer Effects feature, which was a massive leap forward, allowing for editable effects that dramatically improved design quality. If you're a design history nerd, you can read more about Photoshop's evolution on greaterthangatsby.com.
Accessing the Drop Shadow Panel
Everything happens in the Layer Style dialog box. My go-to method is to just double-click the layer in the Layers panel, but you can also click the small 'fx' icon at the bottom and pick 'Drop Shadow' from the list.
Once you do, you'll see the Layer Style panel, which is your command center for the effect.
This is where you'll fine-tune everything from the shadow's angle and softness to its color and opacity.
Pro Tip: The first thing I do is make sure the "Preview" box is checked. This lets you see your adjustments live as you move the sliders, making it way easier to dial in the perfect look instead of just guessing.
Before we get into the nitty-gritty of each setting, let's do a quick fly-by of the main controls you'll be working with.
Core Drop Shadow Settings at a Glance
This little table is a handy cheat sheet for the primary controls in the Drop Shadow panel and what they do. Think of it as a quick-start guide.
| Setting | What It Controls |
|---|---|
| Opacity | The shadow's transparency. Lower it for a more subtle, natural feel. |
| Angle | The direction of your light source, which dictates where the shadow falls. |
| Distance | How far the shadow is pushed away from the object. |
| Spread | The shadow's hardness or "choke" before the feathering is applied. |
| Size | How soft and blurry the shadow's edges are. Higher values mean more blur. |
Having a basic grasp of these five settings is all you really need to start creating believable and effective drop shadows for any project.
Applying Your First Drop Shadow in Photoshop
Alright, let's get our hands dirty and actually add a drop shadow. The very first thing you need to do—and trust me, it's easy to forget in the heat of a project—is to select the right layer in your Layers panel. This could be anything: a text layer, a product you've carefully cut out, or just a simple shape that needs to pop.
Think about a common design task, like a social media graphic. You’ve got this great, bold text you want to lay over a busy, colorful photo. Without some separation, that text is just going to get lost in the noise. This is the perfect real-world scenario where a drop shadow instantly brings clarity and a professional finish.
With your layer selected, it's time to open the Layer Style dialog box. Most designers have their favorite shortcut for this, but there are two main ways to get there:
- The 'fx' Icon: Look at the bottom of your Layers panel for a small fx icon. Click it, and a menu will pop up. Just choose "Drop Shadow" from the list.
- The Double-Click: This is my personal go-to because it's so fast. Simply double-click on the empty space of the layer you want to edit (just be careful not to click the layer's name or its thumbnail).
Either route takes you to the same powerful dialog box where all the magic happens.
Getting to the Right Layer
Before you can add that shadow, you have to tell Photoshop what to apply it to. It all starts with having the correct layer active. This image shows that first, crucial step of highlighting your target layer.
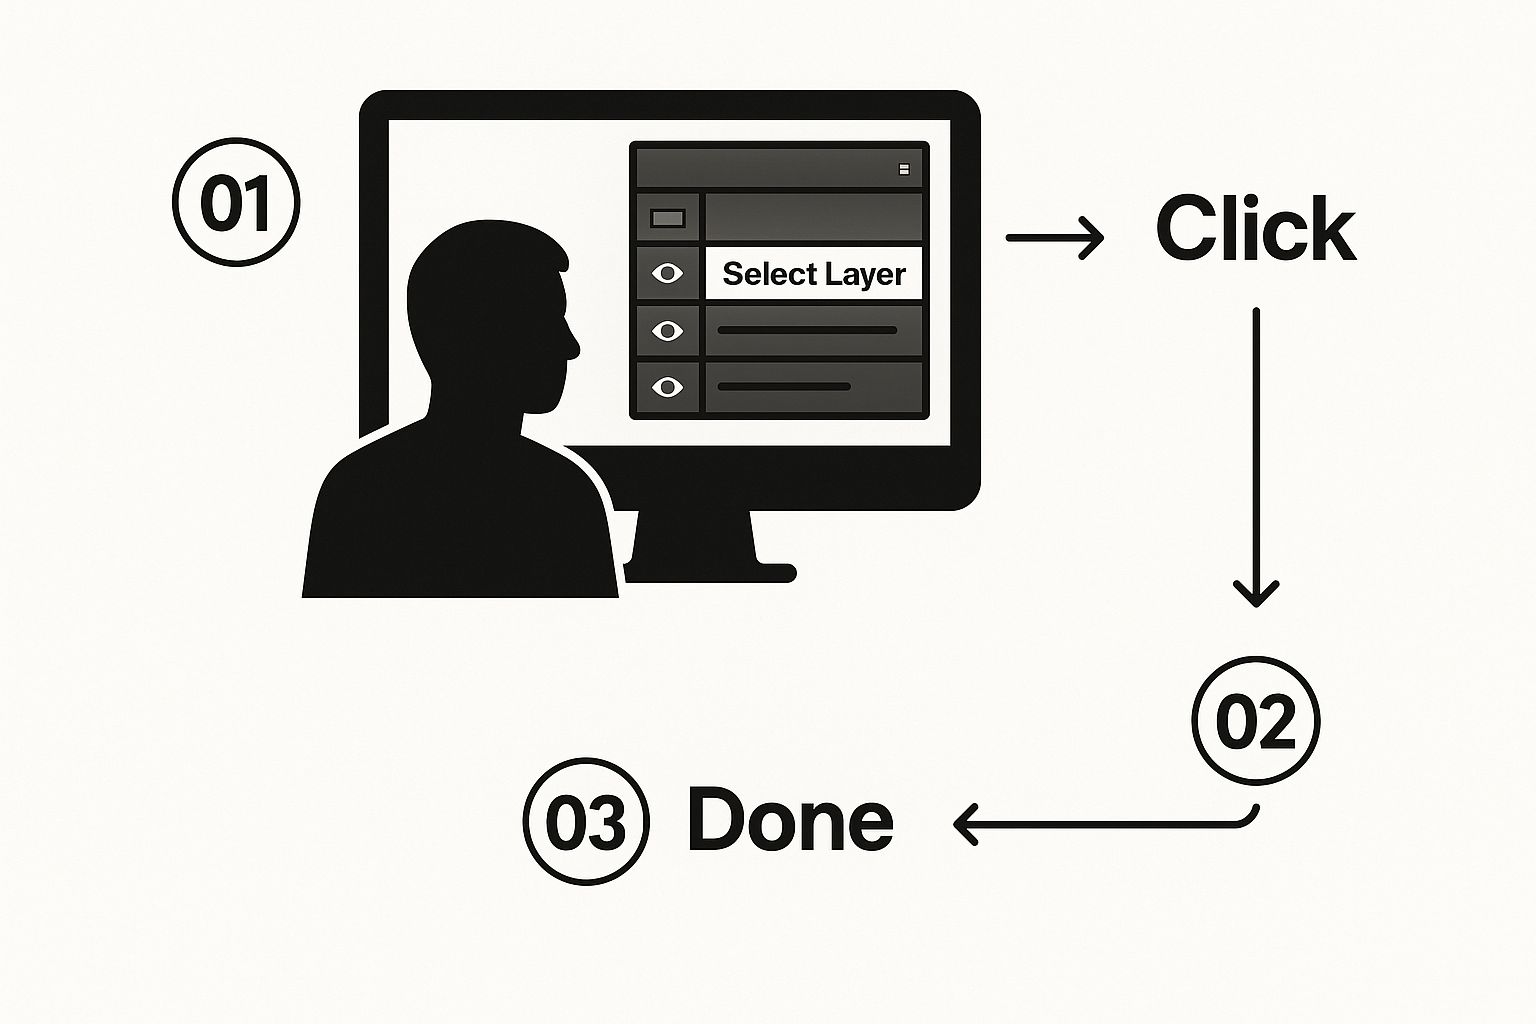
This just reinforces that every non-destructive effect begins by isolating the specific element you want to change.
Key Takeaway: The Layer Style panel is completely non-destructive. This is a huge deal. It means you can add an effect, save and close your file, and come back a week later to tweak the shadow's distance, softness, or color without ever damaging your original layer. It’s flexibility at its best.
As soon as the Layer Style window opens, you'll see a default shadow appear on your canvas (as long as the "Preview" box is checked). Now you're all set to start dialing in the settings. And if you're looking for unique backgrounds to practice on, you can even explore our guide on making stunning visuals with a free AI art generator.
Fine-Tuning Your Drop Shadow for a Realistic Look
Just slapping on a default drop shadow is a rookie move. Honestly, it often looks a bit harsh, almost fake. The real magic—and what separates an amateur from a pro—is in spending a few extra moments tweaking the settings in the Layer Style panel. This is where you transform a generic effect into a shadow that feels intentional and truly belongs in your scene.
This kind of attention to detail is more than just good practice; it's a fundamental skill. Drop shadows are easily one of the top five most-used layer styles by designers everywhere. In fact, data shows that over 75% of marketing and web design projects use some type of shadow to create depth and guide the viewer’s eye. The effect is so foundational that tutorials on how to add drop shadow in photoshop are constantly trending. A quick search will show you just how many designers are trying to master this skill—you can explore the millions of videos on YouTube to see for yourself.
So, let's dial in those settings.
Dialing in the Light Source
The first two sliders you should always reach for are Angle and Distance. Think of them as a team that defines where your light is coming from.
- Angle sets the direction of the light.
- Distance controls how far the shadow is cast. A bigger number here makes it look like your object is floating higher off the surface.
For a grounded, believable effect, I almost always keep the distance small. A subtle shadow that’s close to the object just feels more natural. My go-to starting point is an Angle of about 135° and a tiny Distance, which I then adjust based on the specific image.
Balancing Softness and Hardness
Next up are Spread and Size, which I consider the most important sliders for achieving realism. They control the quality of the shadow's edge.
- Spread: This determines the shadow's solid core before any blur is applied. Pushing this up creates a hard, defined edge—think of the shadow cast by a sticker flat on a piece of paper.
- Size: This slider dictates the blurriness. A larger Size results in a soft, diffused shadow, like one cast from a faraway light source.
My Personal Tip: For a soft, natural shadow, I usually set the Spread to 0% and do all my work with the Size slider. If I need a hard, graphic shadow for a more stylized look, I'll crank up the Spread and keep the Size low.
The Finishing Touches: Contour and Noise
Don't ignore the last two settings! They can add some fantastic character to your shadow.
Contour actually changes the shape of the shadow’s fade-off. The default linear contour works for most situations, but playing with the other presets can create unique effects like double-edged or wavy shadows. It's worth a click just to see what happens.
Finally, there's Noise. This adds a subtle, grainy texture. A tiny bit—even just 1-3%—can break up that perfectly smooth digital gradient, helping the shadow blend more naturally into backgrounds that have any kind of texture.
Take Full Control by Separating Your Drop Shadow
The standard Layer Style panel is a workhorse, and honestly, it gets the job done for most day-to-day shadow work. But what happens when you need to break the rules? For those complex composites or when a shadow needs to bend in an unnatural way, you need more control. That's where a little-known trick comes in: separating the shadow from its layer.
This one move is a total game-changer, especially for photorealistic work. It transforms your drop shadow from a simple, baked-in effect into its own, fully independent, pixel-based layer. You can suddenly manipulate it just like any other element in your document.
It sounds complicated, but it's incredibly simple and unlocks a whole new level of precision when you need to add drop shadow in photoshop.
How to Create a Separate Shadow Layer
First, just apply a basic drop shadow using the Layer Style panel like you normally would. Get the general size and opacity right, but don't obsess over it.
Now, head over to your Layers panel. Find the "Drop Shadow" effect listed right under your layer's name. Instead of double-clicking to edit it, just right-click directly on the effect itself.
From that menu, you'll see an option that says Create Layer. Click it. That's it. Photoshop instantly pulls the shadow effect off the original object and places it onto a brand new layer sitting just beneath.
Key Insight: Once you hit 'Create Layer,' the original Layer Style on your object is gone. The shadow is now free, living on its own layer. This gives you the power to edit it without ever touching the object it came from. Just know this is a one-way street—but it's the only way to get this level of granular control.
Unlocking Creative Possibilities with a Separated Shadow
With your shadow now on its own layer, the entire Photoshop toolbox is at your disposal. This is where the real fun begins.
Here are a few things I do all the time once a shadow is separated:
- Warp It: Use the Warp tool (Edit > Transform > Warp) to make a shadow realistically wrap around a corner or follow the bumpy contour of an uneven surface.
- Fade It Selectively: This is huge for realism. Grab a big, soft Eraser tool, knock the opacity down to about 20-30%, and gently brush away the edges of the shadow that should be fading into the distance.
- Add Realistic Blur: You can apply a Gaussian Blur filter to the whole shadow, but I prefer using a layer mask. This lets me paint in blur only where it's needed, perfectly mimicking how focus falls off in a real photo.
Common Drop Shadow Mistakes to Avoid
A poorly executed drop shadow can instantly scream "amateur." It’s often the little things that give it away, but once you know what to look for, you can easily side-step the common traps and make your work look far more professional. Getting a believable result when you add a drop shadow in Photoshop is all about understanding these pitfalls.
One of the biggest red flags is using the default, pure black shadow. Think about it—in the real world, shadows are almost never solid black. They’re filled with bounced light and absorb subtle hues from their surroundings. Sticking with #000000 often creates a harsh, "pasted-on" effect that feels completely disconnected from the rest of your image.
Instead of defaulting to black, try sampling a color directly from your background. A great trick is to pick a color near your object and then choose a darker, more saturated version of it for the shadow. This one simple change does wonders to ground the object in its environment.
Fine-Tuning for Realism
Beyond just the color, a few other settings are frequently misused and can lead to some pretty unrealistic-looking effects. Dodging these common slip-ups will make a huge difference in the quality of your designs.
- Excessive Distance: Pushing the shadow too far from the object is a dead giveaway. It makes the object look like it's floating awkwardly in space instead of resting on a surface. For a grounded, natural feel, keep the distance subtle.
- 100% Opacity: Real-life shadows are semi-transparent, letting some of the surface texture show through. A shadow at 100% opacity is visually jarring and just looks fake. I almost never push my opacity above 75%, and I often find the sweet spot is somewhere in the 30-50% range.
- Ignoring Global Light: This one is crucial. When you have multiple shadowed objects in a design, you absolutely have to use the Use Global Light setting. If that box is unchecked, each layer’s shadow will have its own light source, creating a chaotic and physically impossible scene.
A great shadow is one you don't even notice at first. Its job is to create depth and separation, not to call attention to itself. The goal is always subtlety and seamless integration.
By steering clear of these mistakes, you ensure your shadows actually enhance your design instead of detracting from it. For more ways to improve your images, check out our guide to discover how to seamlessly add effects to photos and really make your visuals pop. Mastering these small but vital details is what separates good design from great design.
Common Drop Shadow Questions Answered
Even after you get the hang of adding drop shadows in Photoshop, a few common roadblocks can pop up. Knowing the quick fixes for these common issues will make your design workflow so much smoother.
Let's walk through some of the questions I hear all the time.
Can I Save My Drop Shadow Settings for Later?
Yes, and you absolutely should! There’s nothing worse than finally dialing in that perfect, subtle shadow only to have to recreate it from scratch for the next project.
Once you have your settings just right in the Layer Style dialog box, just click the "New Style" button. This saves your entire effect stack—including your perfectly tweaked drop shadow—into the Styles panel. From then on, you can apply that exact look to any other layer with a single click. It's a massive time-saver.
How Can I Apply the Same Shadow to Multiple Layers?
This is another one of those tricks that feels like a superpower once you learn it. Instead of manually adding the effect to every single layer, there's a much faster way.
First, apply the drop shadow to one layer and get it looking right. Then, just right-click on that layer in your Layers panel and choose "Copy Layer Style." Now for the magic part: select all the other layers you want the shadow on (hold Ctrl/Cmd and click each one), right-click again, and hit "Paste Layer Style." Done.
A Quick Tip on Saving: The file format you choose is crucial for how your shadow appears in the final image. A PNG file will keep the transparent background around your shadow, which is usually what you want. A JPEG, on the other hand, will fill that area with a solid color. You can learn more about picking the best image format for the web to make sure your work always looks professional online.
Help! My Drop Shadow Isn't Showing Up!
We've all been there. You apply the effect, and... nothing. It's a classic problem that usually comes down to one of a few simple things.
Here's a quick troubleshooting checklist:
- Check the Layer Fill: Make sure the layer's "Fill" opacity (found in the advanced blending options) isn't set to 0%.
- Check the Shadow's Opacity: Inside the Layer Style settings, double-check that the shadow's own opacity slider isn't set to zero.
- Mind the Background: A black shadow won't be visible on a pure black background. Try changing the shadow's color to something else to see if it appears.
Ready to create stunning visuals for your next project? With over 50 art styles and powerful AI tools, ai-media-studio makes it easy to generate professional-quality images in seconds. Try it for free today!