Optimizing your images for search engines isn't just about shrinking file sizes. It's a comprehensive process that includes picking the right format (like WebP), writing clear alt text, and using smart, keyword-focused file names. These aren't just technical chores; they're essential for boosting your page speed and helping Google actually understand what your images are about.
Why Image Optimization Is a Big Deal for SEO
Let's get straight to the point. Knowing how to optimize your images is more than just a box to tick on your SEO checklist—it's a fundamental part of your business strategy. Why? Because it directly impacts how users experience your site, and ultimately, whether they convert.
More often than not, unoptimized images are the single biggest reason a page loads slowly. And slow pages are conversion killers. They frustrate potential customers and send them running before they even get a chance to see what you're offering.
Picture an e-commerce site with gorgeous, high-resolution product photos. If those images take even a few seconds too long to appear, that potential buyer is gone. They've already clicked away to a competitor with a faster, smoother website. This happens every single day, and it costs businesses real money. From Google's perspective, slow-loading visuals are a huge red flag that signals a poor user experience, which can seriously hurt your rankings.
The Real Impact on Your Website's Performance
The link between how fast your page loads and how users behave is brutally simple. Google’s own data shows that 53% of mobile users will bounce if a page takes more than three seconds to load. And what's the usual suspect? Large, uncompressed images.
But when you get it right, the payoff is huge.
Websites that meet Google's Core Web Vitals—a set of metrics heavily focused on loading performance—can see user engagement jump by as much as 24%. And when you combine faster images with keyword-rich alt text, you can see organic traffic climb by an additional 23% because search engines finally have the context they need to rank your visual content properly.
Before we dive into the "how," let's get a quick overview of what matters most.
Image Optimization Priorities at a Glance
This table gives you a quick summary of the core image optimization tasks and their direct impact on SEO performance. Think of it as your cheat sheet before we get into the details.
| Optimization Task | Primary SEO Benefit | Key Action |
|---|---|---|
| File Compression | Faster Page Load Speed | Reduce file size without major quality loss using tools like TinyPNG or WebP format. |
| Descriptive Alt Text | Improved Accessibility & Keyword Ranking | Write clear, concise descriptions that tell search engines and screen readers what the image is about. |
| Keyword-Rich File Names | Enhanced Search Visibility | Name files like blue-nike-running-shoe.jpg instead of IMG_1234.jpg. |
| Responsive Images | Better Mobile Experience (Core Web Vitals) | Use srcset and sizes attributes to serve different image sizes for different devices. |
| Lazy Loading | Faster Initial Page Load | Defer loading of off-screen images until the user scrolls to them. |
| Choosing the Right Format | Balancing Quality & Speed | Use WebP for modern browsers, JPEG for photos, and PNG for graphics with transparency. |
This isn’t just about making Google happy. It’s about building a better, faster website that keeps users engaged and drives your business forward. Let's turn this technical task into a powerful SEO advantage.
To see how image optimization fits into the bigger picture, it's worth understanding the fundamentals of optimizing overall website performance.
And remember, while shrinking file size is crucial, you can't sacrifice visual quality. For a deeper dive into striking that perfect balance, check out our guide on how to https://ai-media-studio.com/blog/improve-image-quality without slowing things down.
Choosing the Right Image Format and Compression
Picking the right file type for your images feels like a small detail, but it's the very first step in getting your site's visuals right. Get this wrong, and you're stuck choosing between blurry images or bloated pages that send visitors bouncing.
The three big players you'll be working with are JPEG, PNG, and the much more efficient newcomer, WebP. Each one has a specific job to do, and knowing which one to grab for the task at hand is a core skill for anyone serious about web performance.
This whole process is about sidestepping common mistakes before they happen. Think of it like a quick diagnostic—the flowchart below lays out a simple way to spot and fix the most frequent image issues.
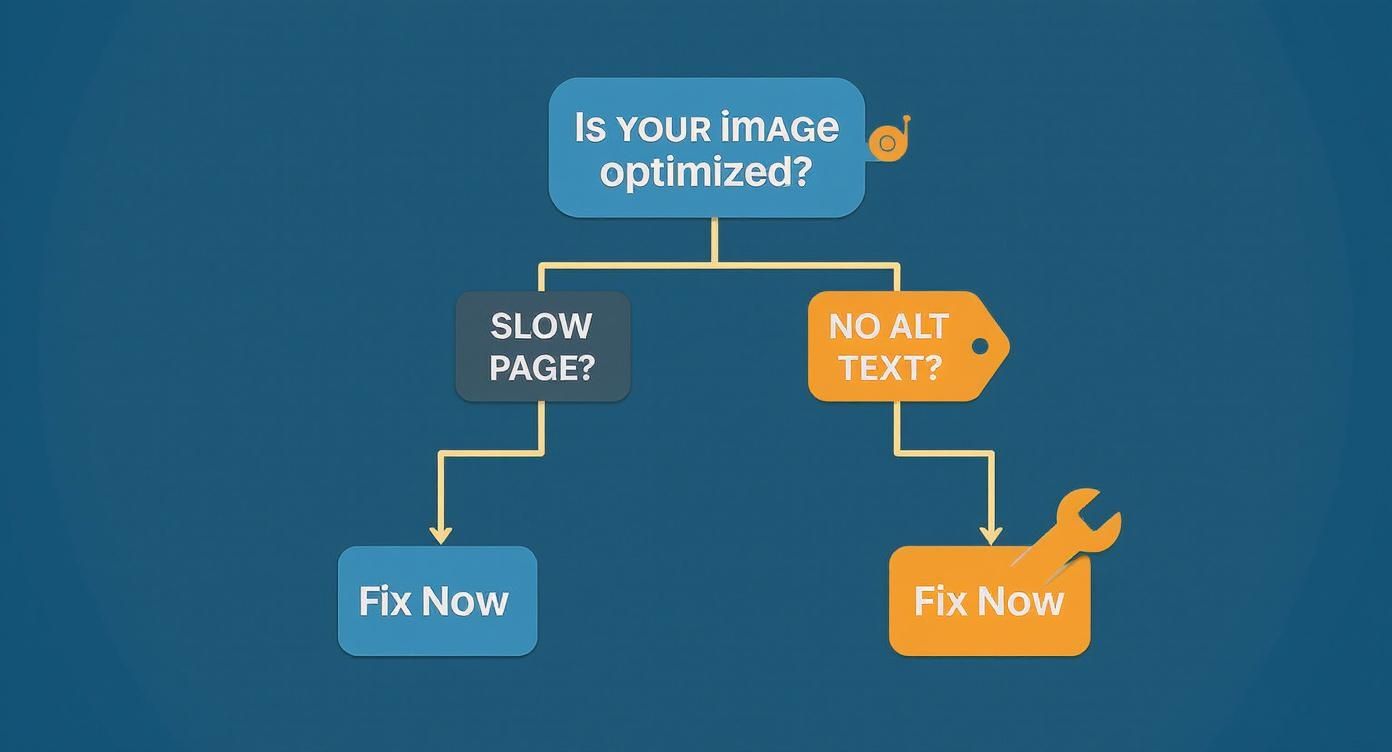
As you can see, problems like a sluggish page or forgotten alt text are clear signs that your images need work. Fixing them is a win-win for both your users and your search rankings.
Lossy vs. Lossless Compression: What's the Difference?
The magic behind shrinking image files is called compression, and it comes in two main flavors: lossy and lossless.
Lossless compression is the perfectionist. It cleverly rearranges the image data into a smaller package without throwing a single pixel away. When you open the file, it’s rebuilt exactly as it was. This is why PNGs use it—it's perfect for logos, icons, and any graphic where you need razor-sharp lines and precise colors.
Lossy compression, however, knows how to make a smart trade-off. It strategically removes tiny bits of data that the human eye won't even miss. The result is a dramatically smaller file, though a tiny fraction of the original quality is gone for good. JPEGs and WebP files lean on this method, making them ideal for rich, complex photographs where a little data loss is completely unnoticeable.
Picking the Right Format for the Job
Your choice here has a real, measurable impact. I've seen client sites jump to 25% faster load speeds just by getting their image formats right. That's a huge deal when you consider that every extra second of loading can slash conversions by 7%.
To make it simple, here’s my go-to cheat sheet:
- Use JPEG for Photographs: Your best bet for standard photos, like product images or blog post headers. It hits that sweet spot between quality and file size.
- Use PNG for Transparency & Simple Graphics: Need a logo with a clear background? PNG is your answer. It's also my choice for screenshots and simple illustrations with hard edges and text.
- Use WebP Whenever You Can: This is Google's modern format, and it’s a game-changer. It can handle both lossy and lossless compression, delivering files that are often 25-34% smaller than a JPEG with no visual difference. Plus, it supports transparency.
To really break down how these formats stack up, here’s a quick comparison.
Image Format Showdown: JPEG vs PNG vs WebP
| Format | Best For | Supports Transparency | Typical File Size |
|---|---|---|---|
| JPEG | Photographs, complex images with gradients | No | Small |
| PNG | Logos, icons, graphics with hard lines | Yes | Medium to Large |
| WebP | Everything (the modern replacement for both) | Yes | Smallest |
Honestly, the takeaway is simple. Start with WebP as your default for everything. Only fall back to JPEG or PNG if you have a very specific browser compatibility issue to solve, which is becoming rarer by the day.
For a deeper dive, our guide on the best image format for web breaks it down even further. You can also explore this great resource on choosing the best image formats for web performance to understand the nitty-gritty technical details. Nail this first step, and you're already well on your way to mastering image SEO.
Naming Your Images for SEO: Files and Alt Text
Before you even think about uploading an image, two of its most critical SEO components are already in your hands: the file name and the alt text. These simple text-based elements are your first, best chance to tell search engines (and people) exactly what your image is about.
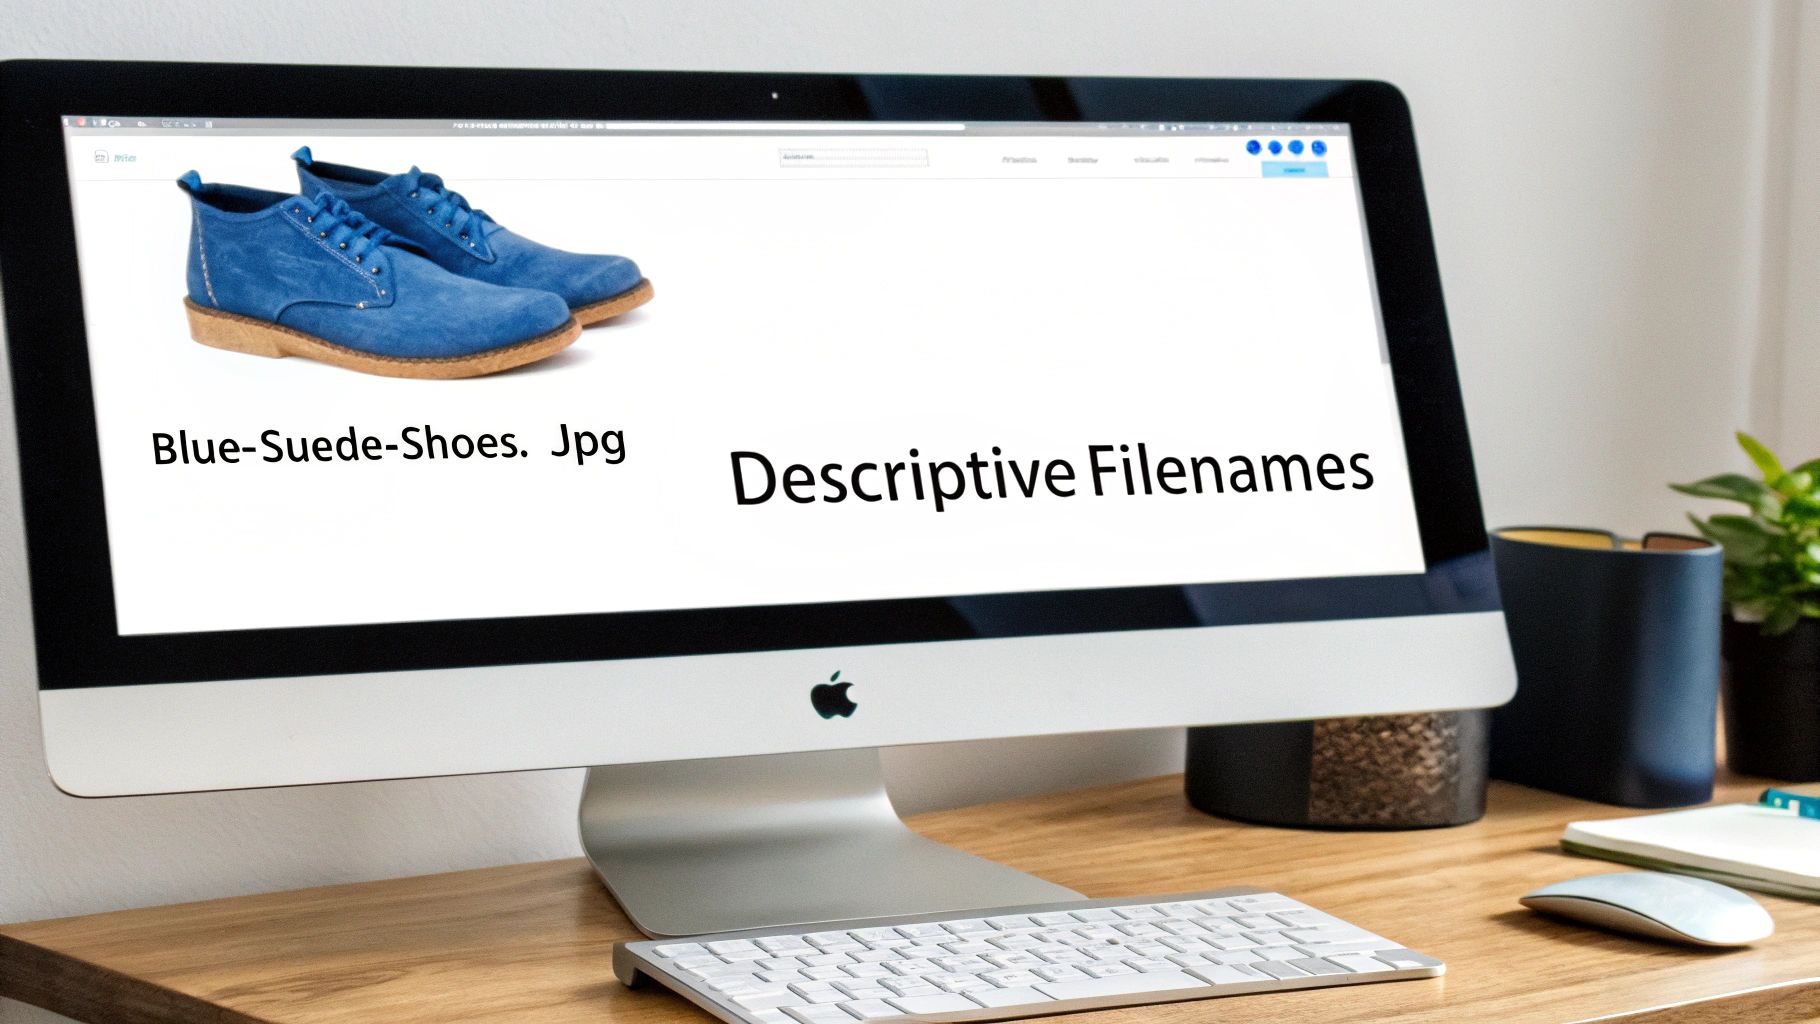
That default file name your camera spits out, something like IMG_8754.jpg or DSC_0023.png, tells a search engine absolutely nothing. It's a huge missed opportunity to signal relevance. Simply renaming your images is one of the easiest, yet most effective, things you can do for image SEO.
The idea is to create a descriptive, readable file name. Put yourself in the shoes of a search engine bot trying to figure out what it's looking at. Stick to lowercase letters and use hyphens to separate words—never underscores.
A Simple Formula for File Names
You don't need a complex strategy here. Just describe what's in the picture and, if it fits naturally, include a relevant keyword.
- Bad:
IMG_8754.jpg(Means nothing) - Okay:
shoes.jpg(Way too generic) - Good:
blue-suede-shoes.jpg(Clear and descriptive) - Best:
blue-suede-shoes-on-display.jpg(Adds valuable context)
This tiny change gives Google an immediate, crystal-clear understanding of your image before its crawlers even analyze a single pixel.
Writing Alt Text for People First, Bots Second
Alt text has two main jobs. Its primary purpose is accessibility. It describes the image for visually impaired users who use screen readers to navigate the web.
Secondly, it gives search engines additional context, reinforcing how the image relates to the text around it. It's also what shows up if an image file breaks or fails to load.
Always write your alt text for a human first. Your goal should be to provide a helpful, accurate description of the image. The good news is that strong accessibility practices almost always translate to good SEO.
This has become even more crucial as AI-powered visual search gets smarter. Search engines don't just read your text anymore; they actually see the image. Making sure your alt text and file names match what's in the picture is a must for ranking well. You can find more insights on how AI is changing image SEO over at wellows.com.
Alt Text Dos and Don'ts
Good alt text is all about being descriptive without overdoing it. Let's look at a couple of examples.
Example 1: A product photo
- Weak:
alt="shoes" - Good:
alt="A pair of blue suede shoes" - Best:
alt="A pair of classic blue suede shoes with white laces on a wooden display stand"
Example 2: A graph or chart
- Weak:
alt="chart" - Good:
alt="Bar chart showing website traffic growth" - Best:
alt="Bar chart showing a 40% increase in website traffic from Q1 to Q2 2024"
Resist the urge to stuff keywords where they don't belong. If your keyword is "best running shoes," a bad alt text would be alt="best running shoes nike running shoes cheap running shoes". Instead, write something natural that describes the scene, like alt="Runner tying the laces of red Nike running shoes before a race". This approach nails both accessibility and SEO without looking like spam.
Making Your Images Work on Every Device
Okay, let's get into the nitty-gritty. This is where we can make some serious performance gains, especially for all those people browsing on their phones—which, let's be real, is a huge chunk of your audience. Getting your images right for different devices isn't just a nice-to-have anymore; it’s a non-negotiable part of modern SEO that has a direct line to your Core Web Vitals scores.
Think about it. Pushing a massive, high-res image designed for a 27-inch monitor onto a tiny smartphone screen is a massive waste of data. It’s one of the biggest culprits behind slow-loading mobile sites. Thankfully, we have some clever HTML to fix this.

Use Srcset to Make Images Responsive
The srcset attribute is your secret weapon here. It essentially turns your standard <img> tag into a smart, adaptive element. Instead of force-feeding the browser one image and hoping for the best, you give it a menu of different-sized versions. The browser then looks at the user’s screen and picks the perfect one for the job.
A basic image tag is straightforward:
<img src="image-large.jpg" alt="A detailed product photo">
But with srcset, it gets a whole lot smarter:
<img src="image-large.jpg" srcset="image-small.jpg 480w, image-medium.jpg 800w, image-large.jpg 1200w" alt="A detailed product photo">
See what's happening? The w unit tells the browser the pixel width of each image file. It can then grab the smallest possible file that still looks sharp, without wasting a single byte. If you want a deeper dive, we have a whole guide on how to resize images for the web that walks through it.
The best part? If you're using a modern CMS like WordPress, this often happens automatically. When you upload an image, it quietly creates all these different sizes for you.
Get a Speed Boost with Lazy Loading
After making your images responsive, the next biggest performance win comes from lazy loading. It’s a beautifully simple concept that drastically cuts down initial load times. It tells the browser, "Don't bother loading any images that are off-screen yet."
Instead, the images only get loaded right as the user scrolls down and they're about to pop into view. This means the content they see first—the "above the fold" stuff—snaps into place almost instantly. That perception of speed is huge for user experience and a major plus for search engines.
Lazy loading is the perfect example of how focusing on user experience pays off in SEO. By loading what the user sees first, you nail those critical Core Web Vitals and keep visitors happy.
Getting this set up is almost comically easy these days, thanks to native browser support. All you need to do is add one little attribute to your image tag: loading="lazy".
So your final tag looks like this:
<img src="your-image.jpg" alt="A descriptive alt text" loading="lazy">
That's it. This single attribute is a command to all modern browsers to hold off on loading that image until it's needed. Most current website platforms and plugins have this enabled by default, but it’s always worth a quick check of your site’s code to make sure. It’s one of the fastest, easiest wins you can get for your site's performance.
Advanced Image SEO: Speaking Directly to Google with Schema and Sitemaps
So you've nailed the basics of file names and compression. Fantastic. Now it's time to pull away from the competition by giving search engines a VIP roadmap to your visual content.
We're going to talk about speaking directly to search crawlers in their own language. This is where structured data and sitemaps come in. These tactics go way beyond surface-level tweaks; they provide explicit context that helps Google not just find your images, but truly understand them. The payoff? Better visibility, and even a shot at those coveted rich results.
Give Your Images Context with Schema Markup
Structured data, or schema markup, is basically a vocabulary you add to your website's code to tell search engines exactly what your content is about. For our purposes, we'll focus on the ImageObject schema. It lets you spell out specific details like who created the image, its caption, and even licensing information.
This extra layer of detail is gold. It helps Google understand an image's purpose and can qualify it for special features, like the "licensable" badge you sometimes see in image search. That little badge alone can drive highly targeted traffic from people who are actively looking for images to use.
Getting this implemented is a lot simpler than it sounds, especially using JSON-LD (the format Google prefers).
Here's a straightforward example you could adapt for an image in one of your blog posts:
{ "@context": "https://schema.org", "@type": "ImageObject", "contentUrl": "https://yourwebsite.com/images/blue-suede-shoes.jpg", "license": "https://yourwebsite.com/image-license", "acquireLicensePage": "https://yourwebsite.com/buy-image", "creditText": "Your Name/Company", "creator": { "@type": "Person", "name": "Your Name" }, "copyrightNotice": "© 2024 Your Company" }
By dropping that snippet into your page's HTML, you're explicitly telling search engines who made the image, how to license it, and where to give credit. It's a massive signal of authority and context.
Think of schema markup as a detailed spec sheet you're attaching to your image file. Instead of just showing Google a picture, you're handing it a full dossier, leaving zero room for misinterpretation.
Make Sure Every Image Is Discovered with a Sitemap
Google's crawlers are incredibly smart, but they aren't perfect. They can sometimes miss images, especially if they're loaded with JavaScript or tucked away inside a fancy gallery. An image sitemap completely solves this problem. It's a direct, no-nonsense list of every important image URL on your site.
This ensures all your key visuals get indexed and have a chance to rank. The sitemap is just a simple XML file that you submit to Google Search Console, acting as the definitive guide for crawlers.
Your sitemap entry for each image should include a few key tags:
<image:image>: The container for all the info about a single image.<image:loc>: The direct URL to the image file itself. This is the most important part.<image:caption>: A short, sweet description of the image.<image:title>: The title of the image.
Most modern SEO plugins for platforms like WordPress can generate this for you automatically, so you might not even have to get your hands dirty. If you do build one manually, just list out all your crucial visuals. Once it's ready, add its location to your robots.txt file and submit it in Google Search Console. It's a simple step that guarantees no valuable image gets left behind.
Common Questions on How to Optimize Images for SEO
Even with the best game plan, you're bound to run into a few questions once you start optimizing images. I get asked about this stuff all the time, so I’ve pulled together the most common ones to give you clear, no-nonsense answers and get you back on track.
What’s the Ideal File Size for a Web Image?
There’s no magic number, but a fantastic target to aim for is under 100-150 KB. That’s the sweet spot for most images on your site.
For those big, beautiful hero images that stretch across the top of a page, you might have to creep up to 250 KB. Just remember, the goal is always to keep the file size as lean as possible without making the image look like a blurry mess. It's a balancing act between quality and speed.
Modern formats like WebP and a good compression tool are your best friends here. They help you shrink the file size while keeping the image looking sharp, which is critical for keeping your mobile visitors happy.
Can I Use AI Tools to Write My Alt Text?
Yes, but with a big asterisk. AI tools are a great way to kick things off—they can save you a ton of time by generating a basic description of what's in an image.
The problem is, AI doesn't know the context of your page. It can't understand why that image is there. Your alt text needs to be more than just a literal description; it needs to be relevant to the content around it to really nail the SEO and accessibility.
Think of AI as your helpful assistant, not the final author. It does the initial heavy lifting, but your human touch is what adds the contextual nuance that makes alt text truly effective for both accessibility and SEO.
So, let the AI get you started, but always jump in yourself to refine it. Add the context, sprinkle in the right keywords naturally, and make sure it genuinely serves both users and search engines.
Does Changing an Image File Name Affect SEO?
You better believe it does. Swapping a generic file name like DSC_001.jpg for a descriptive one like red-nike-running-shoe.jpg is one of those fundamental SEO moves you just can't skip.
Search engines use the file name as a major clue to figure out what an image is about. A descriptive, keyword-rich file name gives your images a much better shot at ranking in Google Images and reinforces the topic of the entire page.
One critical tip: if you're updating old images that Google has already indexed, you must set up 301 redirects. This tells Google that the old image URL has permanently moved to the new one. Skipping this step means you'll create broken links and lose any SEO juice the old image had. It’s a simple step that preserves all your hard-earned value.
Ready to create stunning visuals for your blog without the hassle? AI Media Studio lets you generate professional-quality images from simple text prompts in seconds. Get started for free and elevate your content today.