If you're looking to improve your image quality, you have two main paths. You can lean on AI-powered tools for quick enhancements like upscaling and noise reduction, or you can roll up your sleeves and use manual editing techniques for precise control over things like sharpness and color.
Honestly, the best approach usually mixes the two. I like to use the speed of AI for the heavy lifting and then add my own manual adjustments for that professional, natural-looking finish.
Why High-Quality Images Matter More Than Ever

In a world absolutely drowning in visual content, the quality of your images isn't just a nice-to-have anymore. It's a critical piece of the puzzle that directly shapes how people see you and whether they engage with your work.
Think about it. A sharp, clear image screams professionalism and helps build trust. A blurry or pixelated one? It can make a brand feel sloppy, leading to higher bounce rates and missed chances. This isn't just about making things look pretty; it's a fundamental part of communicating effectively.
Take the user experience, for example. When someone lands on an e-commerce site, high-resolution product photos let them zoom in and really inspect the details—it's the closest they can get to an in-person shopping trip. A low-quality image just creates friction and doubt, often pushing them right into the arms of a competitor. This standard holds true everywhere, from your social media feed to your professional portfolio.
The Growing Demand for Visual Excellence
The bar for visual quality is always rising. With smartphone cameras getting ridiculously powerful and internet speeds getting faster, people are just used to seeing sharp, vibrant images. A photo that might have passed muster a few years ago now sticks out like a sore thumb, and not in a good way. This shift has created a huge market for tools designed to help everyone meet these new expectations.
You can see this demand reflected in the market numbers. The global digital image processing market was valued at a whopping USD 5.16 billion in 2022 and is on track to grow even more. A huge chunk of that growth is driven by industries like e-commerce, where top-notch visuals are non-negotiable for grabbing attention and making sales. If you're interested, you can dig into more data on these market trends to see just how big this is.
The core takeaway is simple: Mastering the ability to improve image quality is not just a technical skill. It has become a fundamental strategy for anyone looking to capture attention, build credibility, and succeed online.
The Real-World Impact on Your Goals
At the end of the day, the quality of your visuals has a real, measurable impact on whether you hit your targets.
- For Businesses: High-quality images can directly lead to a measurable increase in sales and customer trust. It's a straight line from good photos to more revenue.
- For Creators: Crisp visuals are essential for building a professional brand and can seriously boost audience engagement on platforms like Instagram and Pinterest.
- For Everyone: Clear, well-executed photos ensure your message lands without being sabotaged by poor technical quality.
Diagnosing Common Image Quality Problems
Before you can fix a bad photo, you have to know what's actually wrong with it. Think of yourself as an image detective. Simply throwing an "auto-enhance" filter at every picture is a shot in the dark—sometimes it works, but most of the time, you’re just making things worse.
Learning to spot the tell-tale signs of common issues is the first, most crucial step. Is the image just a bit blurry, or is it covered in that ugly, grainy texture? Are the colors washed out, or are you seeing weird, blocky shapes? Each problem has a unique cause, and each one needs a different fix.
Identifying the Root Cause
Most of the time, poor image quality boils down to a few usual suspects: pixelation, blurriness, digital noise, and compression artifacts. Each one gives you clues about the image's history and what went wrong along the way.
Pixelation, for instance, is when you can literally see the little squares that make up the image. This is a dead giveaway that the image resolution is too low for the size it's being displayed at. It’s like stretching a small photo to fit a huge billboard—the details just fall apart. Blurriness, on the other hand, usually happens in-camera. It could be from a shaky hand or the camera focusing on the background instead of your subject.
Then there's digital noise. This shows up as a grainy, speckled pattern, and it’s especially common in photos taken in low light. It happens when the camera's sensor has to crank up its sensitivity (ISO) to capture a picture, which introduces random flecks of color and light.
To really nail the fix for digital noise, you can't just guess. You need a clear plan.
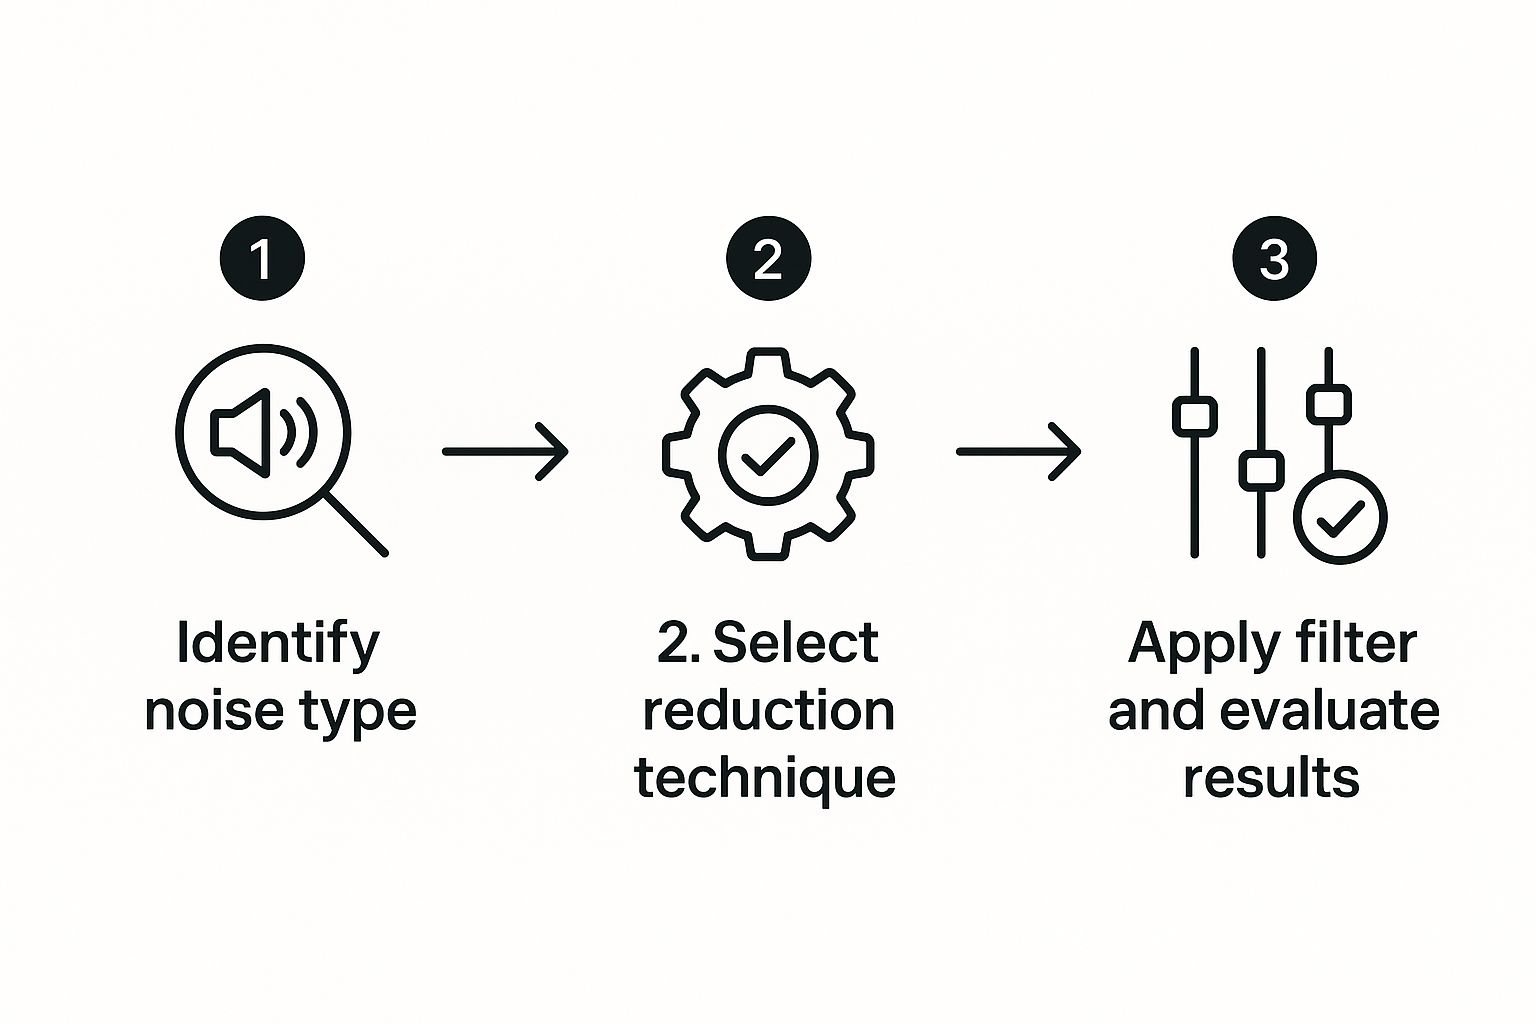
The big takeaway here? Diagnosis always comes first. A targeted strategy for reducing noise will always give you a cleaner, more professional result than a generic, one-size-fits-all filter ever could.
Compression Artifacts and Color Issues
Another all-too-common problem is what we call JPEG artifacts. Ever seen those blotchy, blocky distortions around sharp edges in a picture? That's what happens when a JPEG file is compressed too much. To keep file sizes small, this "lossy" format throws away some image data. Overdo it, and the damage becomes painfully obvious.
Finally, let's talk about color. An image with low color depth might suffer from banding, where a smooth gradient—like a sunset or a clear blue sky—looks like a series of distinct colored stripes. This tells you the file just doesn't contain enough color information to render a smooth, natural transition.
To help you get better at spotting these issues, here's a quick cheat sheet.
Quick Guide to Image Issues and Their Causes
| Issue | What It Looks Like | Common Cause |
|---|---|---|
| Pixelation | Visible, blocky squares; jagged edges. | Scaling a low-resolution image up too large. |
| Blurriness | Soft, out-of-focus details. | Camera shake, motion blur, or missed focus. |
| Digital Noise | Grainy, speckled, or colorful dots. | High ISO settings, often from shooting in low light. |
| JPEG Artifacts | Blocky or "mosquito" noise around edges. | Over-compressing a JPEG file to reduce its size. |
| Color Banding | Visible steps or stripes in color gradients. | Low color depth (e.g., 8-bit image) or compression. |
This table is your quick reference for figuring out exactly what you're dealing with.
By learning to spot these specific flaws, you move from guessing to making informed decisions. You can choose an AI upscaler for pixelation, a de-noise tool for grain, or a sharpening algorithm for motion blur.
Once you can confidently identify the problem, you're ready to explore the tools that will fix it. After you’ve corrected these foundational quality issues, you can start getting creative. If you're looking to take that next step, our guide on how to add effects to photos is a great place to start. Mastering this diagnostic part of the process is what will empower you to get the best possible results, every single time.
Using AI Tools to Effortlessly Enhance Your Images

This image, created entirely by an AI model, is a perfect example of how these systems can build stunningly complex visuals from just a few words. That same power is what allows them to repair and breathe new life into existing photos. With models like Imagen 3 advancing so quickly, AI can produce incredibly high-quality images and understand even the most subtle editing instructions.
Artificial intelligence has completely changed the game for photo editing. What once required years of technical skill can now be done with a few clicks, making professional-level fixes accessible to everyone. Forget spending hours fumbling with manual tools—you can get amazing results in seconds.
Turning Blurry Shots into Sharp Assets
We’ve all been there. You take what you think is the perfect product shot for your online store, only to find it's just slightly out of focus. In the past, that photo would have been a lost cause. Not anymore.
AI upscaling and sharpening tools can rescue those shots. These aren't just generic filters; the algorithms actually analyze the photo’s content to intelligently reconstruct edges and bring back lost detail. It's a game-changer.
This process is perfect for:
- Restoring old family photos that have gone soft and faded over the years.
- Sharpening product images to give your e-commerce site a clean, professional look.
- Improving screenshots or low-res graphics so they look crisp in presentations.
This technology has exploded. The market for AI image enhancers hit around USD 2.11 billion in 2024 and is on track to reach USD 2.45 billion by 2025. Why? Because the results speak for themselves, delivering huge improvements in resolution, noise reduction, and color.
Saving Low-Light Photos from Digital Noise
Another classic headache is digital noise—that grainy texture that ruins photos taken in low light. AI noise reduction is exceptionally good at cleaning this up.
Traditional tools often just blur the grain away, leaving you with a waxy, unnatural-looking image. AI, on the other hand, can tell the difference between unwanted noise and important details, like the texture of fabric or skin. It cleans up the mess without destroying the photo.
This is where AI truly shines—it’s contextual. It understands what it’s looking at and applies fixes selectively. The result is a clean photo that still looks natural.
This tech is a lifesaver for anyone shooting events in tricky lighting or just trying to save a cherished nighttime photo snapped on a phone. It’s also incredibly useful for cleaning up video footage suffering from the same grainy issues.
Reviving Dull Images with Smart Color Correction
Let’s be honest, many photos come straight out of the camera looking a bit flat and lifeless. The colors just don't pop. This is where AI-powered color correction can work wonders in an instant.
Instead of you having to fiddle with endless sliders for brightness, contrast, and saturation, an AI tool analyzes the image and makes smart adjustments on its own. It might see a washed-out sky and boost the blues, or recognize a face and correct the skin tones to look more natural and healthy.
This automated process is a massive time-saver and often produces a more balanced, pleasing result than you could get on your own, especially if you're not a pro editor.
The best part? Many platforms now offer a whole suite of these features in one place. You can explore a variety of these solutions by checking out the different AI media tools available to see just how dramatically they can transform your images.
Mastering Manual Edits for Ultimate Control
AI tools are incredible for the heavy lifting, but let's be honest—sometimes an image just needs that human touch. This is where you, the creator, step in to add the final polish that truly elevates an image from good to perfect.
Think of it this way: AI gets you 90% of the way there, fast. But that last 10% is where the real artistry happens. For example, an AI might sharpen an entire photo, but the texture on a subject's woolen sweater suddenly looks harsh and unnatural. This is your cue to jump in.
A subtle Unsharp Mask is perfect for this. It gives you surgical control over the sharpening amount, radius, and threshold, so you can bring out the crisp details only where they matter most. It’s the difference between something mass-produced and a finely handcrafted piece. You can feel the intention.
The Power of Precision Tools
Sometimes, AI just misses the little things. It might not notice a stray hair, a tiny blemish on a product, or a distracting object lurking in the background. These small details can pull focus and ruin an otherwise great shot.
This is where classic tools like the Clone Stamp and Healing Brush are your best friends.
- Healing Brush: I constantly use this for cleaning up small imperfections in product photography. It intelligently blends texture, light, and color from the surrounding pixels, making edits completely invisible.
- Clone Stamp: This is my go-to for bigger jobs, like removing a distracting sign from a landscape. It directly copies pixels from one area to another, giving you precise control over complex removals.
The real goal here is to make edits that are seamless. When you take something out, the viewer should never even suspect it was there. That level of finesse is the hallmark of a pro.
Finding Your Hybrid Workflow
The most effective editing workflow is almost always a hybrid one. You start with AI for the broad strokes—upscaling a low-res image or doing an initial pass on noise reduction. Then, you switch to your manual toolset for the detailed, artistic work.
Take color grading, for instance. I'll often let an AI tool handle the basic white balance and exposure correction. From there, I’ll open up the Curves tool for the creative adjustments.
A gentle S-curve can add stunning contrast, while tweaking individual red, green, or blue channels lets you dial in a specific mood—like a warm, golden-hour glow or a cool, cinematic blue. This controlled approach gives you the best of both worlds.
It's a principle seen in other advanced fields, too. For example, quantitative optical imaging has long relied on precise control systems to fix distortions in scientific visuals, which you can learn more about in these imaging control methods on Science.gov. By combining AI's raw power with your artistic direction, you get a polished image that looks professional and natural, not over-processed and robotic.
Common Editing Mistakes and How to Avoid Them
We’ve all seen them—photos that have been pushed a little too far in editing. The line between a beautifully enhanced image and an "overcooked" digital mess is razor-thin, and it’s a trap many fall into. Pushing sliders just a hair too much can take a great shot and make it look amateurish and distracting.
Learning to recognize these common slip-ups is the first step toward producing professional-looking results that genuinely improve your photos without screaming, “this has been heavily edited!”
One of the most common culprits is over-sharpening. A touch of sharpness can make details pop, but go overboard and you’ll start seeing unnatural "halos" or bright, glowing lines around every edge. The whole image takes on a crunchy, brittle appearance that’s especially obvious on textures like hair, foliage, or fabric. Your goal is crispness, not a gritty, high-contrast outline.
Right behind that is the classic mistake of cranking up the color saturation. It’s so tempting to make those colors burst off the screen, but it’s a quick way to make an image look cartoonish and fake. Skin tones can suddenly shift into an unnatural orange, and a beautiful blue sky ends up looking like it was colored in with a Sharpie. Often, just a subtle boost is all that’s needed to make the colors feel rich and true to life.
The Pitfall of Waxy Textures
Then there’s the sneaky problem of heavy-handed noise reduction. When you get too aggressive with removing grain from a photo shot in low light, you almost always strip away the fine details along with it. This is what creates that plastic, waxy look that is especially unflattering on skin.
A better approach is often to embrace a little bit of fine grain. It can give the photo a more natural, film-like quality compared to a completely sterile, unnaturally smooth surface. The key is finding a balance—reduce the distracting noise without completely erasing the essential texture.
These editing missteps don't just look bad; they can seriously undermine the professionalism of your brand or the authenticity of your personal photos.
- Over-sharpening: Creates that harsh, digital look that feels artificial.
- Excessive Saturation: Leads to unrealistic colors that can be jarring and unpleasant.
- Aggressive Noise Reduction: Leaves you with a smooth but detail-less image that lacks depth and character.
Luckily, avoiding these mistakes really comes down to exercising a bit of restraint and developing a good eye. While you’re editing, make a habit of zooming in to 100% to check the details. Constantly toggle between your edited version and the original to make sure you haven’t strayed too far from reality. And here's a pro tip: step away from the screen for a few minutes. When you come back, your eyes will be fresh, and you'll spot over-editing much more easily.
Achieving a Natural, Balanced Edit
Finally, don't let your hard work go to waste in the final step. Saving your perfectly edited photograph in the wrong format can undo all your efforts by introducing compression artifacts or washing out colors. Understanding the difference between file types is a crucial part of the process.
For a deep dive into this, take a look at our guide on choosing the best image format for the web. It’ll help you make sure your final output looks just as good online as it does on your editing screen.
Ultimately, great editing is about making a photograph look like its best possible self—not like a different photo entirely. By keeping these common errors in mind, you can ensure your enhancements lead to a polished, professional, and believable result every time.
Frequently Asked Questions About Image Quality
Diving into image enhancement always brings up a few practical questions. As you start fixing your own images, it's natural to wonder about the real-world limits and what the pros do. This section tackles the most common things people ask when they're in the middle of an edit.
Can I Turn a Tiny Image Into a Poster?
While AI upscaling can feel like magic, it definitely has its limits. You can absolutely improve a small image for web use or a small print, but trying to blow up a tiny thumbnail into a massive poster is going to look soft and pixelated. It's just a reality of the tech.
AI works by intelligently adding new pixels based on what it's learned from millions of other images. But here's the catch: it can't invent fine details that were never captured in the first place. My personal rule of thumb is to always start with the highest-resolution photo you have. It's the single best way to guarantee great results from any enhancement tool.
What Is the Real Difference Between an AI Enhancer and a Filter?
This is a great question. A basic filter, like the kind you swipe through on Instagram, just slaps a uniform set of adjustments over your entire image. Think of it as a simple overlay—it might boost contrast or add a color tint everywhere, regardless of what's actually in the photo.
An AI enhancer is playing a completely different game. It analyzes the content of your photo, identifying specific objects, faces, and problem areas. It then applies targeted fixes. For example, it might reduce noise only in the sky or sharpen the edges of a building without making a person's skin look unnatural.
It’s a dynamic, contextual process, not a static overlay. The AI understands what it's looking at and makes smart, localized corrections for a much more natural outcome.
Should I Save My Enhanced Photos as JPEG or PNG?
The right answer here really depends on the image itself and where you plan on using it. There's no single "best" format that works for everything.
- JPEG (for photographs): For complex photos with millions of colors, a high-quality JPEG is perfect. It gives you a fantastic balance between image quality and a manageable file size. Just keep in mind that JPEG is a "lossy" format, which means a tiny bit of quality is lost every time you re-save the file.
- PNG (for graphics): If your image has sharp lines, text, or needs a transparent background—like a logo or an infographic—PNG is the clear winner. It's a "lossless" format, so it preserves every single pixel of detail perfectly. This is why it’s the professional standard for non-photographic visuals.
Is It Possible to Fix a Truly Out-of-Focus Photo?
You can certainly improve it, but a true fix is usually out of reach. It’s important to understand the two main types of blur. Motion blur, which comes from a shaky camera, can often be significantly reduced with AI sharpening tools. The result can look much crisper.
However, if the lens itself was fundamentally out of focus when the picture was taken, that core detail was never captured by the sensor. AI can sharpen the soft edges that are there, making the image look noticeably better, but it can't recreate intricate details that were lost. The improvement can be impressive, but it won't be as sharp as a photo that was properly focused from the start.
Ready to stop wrestling with blurry, noisy photos and start creating stunning visuals in seconds? AI Media Studio gives you the power to upscale, enhance, and generate professional-quality images without any technical headaches. Try it for free and see the difference AI can make. Explore our tools now at ai-media-studio.com.