An AI pixel art generator is a tool that turns simple text prompts into unique, retro-style images. These generators are a game-changer for everyone from indie game developers to hobbyists, letting them create high-quality pixel art in seconds—no traditional digital art skills required.
How AI Pixel Art Generators Are Changing Creative Workflows
Instead of spending hours meticulously arranging individual pixels, you can now generate entire scenes, character sprites, and other assets just by describing what you want. This shift is huge. It lets artists and developers rapidly prototype ideas, play around with different visual styles, and churn out assets at a scale that was totally out of reach for small teams or solo creators.
The New Creative Freedom
But this tech isn't just a time-saver; it’s unlocking entirely new ways to be creative. An indie dev can dream up dozens of enemy variations for their game in a single afternoon. A blogger can create custom 8-bit illustrations for their posts. A marketer can design a unique, retro-themed ad campaign without having to hire a specialist artist.
The benefits are immediate and impactful:
- Speed: Go from a text idea to a finished piece of art in minutes, not days.
- Accessibility: You don't need a deep understanding of color theory or pixel-perfect drawing.
- Consistency: Generate a whole library of assets that all share a unified, cohesive style.
- Experimentation: Test out wild concepts without sinking a ton of time into them.
This newfound accessibility is fueling massive growth in the market. The global AI image generator market was valued at USD 418.4 million in 2024 and is on track to hit over USD 1 billion by 2030—a pretty clear sign of how widely these tools are being adopted.
The real magic of an AI pixel art generator is that it handles the tedious grunt work. This frees you up to focus on the big picture—the overall vision, the character design, and the world-building.
If you're interested in the broader implications of AI in creating game assets, this discussion on Artificial Intelligence and Game Development is a fantastic read. From here on, this guide will walk you through how to get the most out of this technology, from the initial setup all the way to the final export.
Setting Up Your First Pixel Art Project
Before you can start crafting the perfect prompt, you’ve got to lay the groundwork. Think of this as setting up your digital canvas; a few smart choices right now will save you a world of frustration later on. The decisions you make about resolution, style, and color will directly shape everything the AI generator spits out.
First things first, you need the right tool for the job. Not all AI generators are created equal. Many are brilliant at photorealism but struggle with the unique constraints of pixel art, often producing blurry or overly complex images. You want to find a generator that either specializes in pixel art or has dedicated models that understand the art form's core principles—things like limited palettes and crisp, clean lines.
Choosing Your Canvas Resolution
Once you’ve picked your tool, your most important decision is resolution. This isn't just a technical spec; it's the very soul of your art's aesthetic.
A tiny 16x16 pixel canvas will give you that chunky, super-retro feel of early 8-bit games, where every single pixel carries immense weight. Bumping it up to 32x32 or 64x64 is where you start hitting the 16-bit era, reminiscent of classic SNES titles. This range is often the sweet spot for character sprites that need personality without losing that authentic retro vibe.
To help you visualize where to start, here's a quick breakdown of common resolutions and what they're typically used for.
Choosing the Right Resolution for Your Pixel Art
| Resolution | Common Use Case | Level of Detail | Best For |
|---|---|---|---|
| 16x16 | Icons, simple enemies | Very Low | Abstract, 8-bit style, quick prototypes |
| 32x32 | Player characters, items | Medium | Classic 16-bit style, detailed sprites |
| 64x64 | Detailed portraits | High | Expressive characters, complex objects |
| 128x128+ | Scenery, backgrounds | Very High | Richly detailed scenes, modern retro look |
This table should give you a solid starting point. For example, if we wanted to create a main character for a 2D platformer, a 32x32 canvas is a fantastic choice. It gives us just enough space for key features while keeping the sprite clean and readable in-game.
Defining Your Art Style and Palette
With resolution locked in, it's time to think about your art style and color palette. These two elements are what make your creations feel cohesive and intentional. Are you chasing the bright, punchy colors of an arcade classic, or the moody, limited tones of a Game Boy game?
Let's stick with our platformer hero. We could aim for a "SNES-inspired fantasy" style. This simple phrase gives the AI a clear direction, telling it to mimic a 16-bit aesthetic with a slightly more vibrant color palette.
Here are a few other ideas to get your gears turning:
- Style:
8-bit,16-bit,isometric,top-down RPG - Palette:
monochrome green,4-color,vaporwave,NES palette
Pro Tip: I’ve found it’s always best to state your style and color constraints before you describe the subject of your prompt. This primes the AI with the most important rules first, which almost always leads to more authentic and consistent results.
By settling on these fundamentals—your tool, resolution, and style—you've built a solid framework. This prep work makes the fun part, writing prompts, much more effective and predictable.
Writing Prompts That Create Perfect Pixels
The real secret to getting incredible results from any pixel art generator isn't hidden in some obscure setting—it's all in the words you choose. A well-crafted prompt is your blueprint for the AI, guiding it past generic outputs and toward the exact vision you have in your head.
Think about it. A simple prompt like "wizard" will get you an image, sure. But it’ll probably be a forgettable, boilerplate character. The magic happens when you start layering in specific, descriptive keywords that take control of the subject, style, and even the technical constraints of your final piece.
The Anatomy of a Powerful Prompt
An effective prompt is really just a collection of clear instructions. Each part you add removes ambiguity and leaves less room for the AI to make creative choices you don't want. Your goal is to be the art director, not just a client with a vague idea.
Here’s a simple framework I use that works wonders:
- Subject: What’s the main focus? Get specific. Don't just say "knight," try "heavily armored knight with a massive greatsword."
- Style: This is where you nail the retro aesthetic. Use terms like
8-bit,16-bit,isometric, orSNES styleto set the visual tone. - Action or Pose: Is your character just standing there? Tell the AI. Specify
casting a spell,idle stance,side view, orwalking animation frame. - Color Palette: Never leave color to chance. You can command a specific look with phrases like
limited 4-color palette,monochrome, orGame Boy green. - Composition: Control the scene with terms like
simple background,close-up portrait, or the super-usefulon a transparent background.
The growth in this space is a huge part of the broader digital art market, which was valued at USD 5.8 billion in 2025 and is projected to hit USD 11.81 billion by 2030. Understanding how to create these assets puts you right in the middle of that trend.
From Basic to Brilliant: An Example
Let's put this structure into practice and upgrade our vague "wizard" prompt. A beginner might just type a wizard and hope for the best.
Now, let's apply our framework for a much better prompt: tiny 16-bit wizard character, side view, casting a spell, limited 4-color palette, simple background.
The difference in results is night and day. The first prompt is a complete gamble. The second is a clear set of instructions that will reliably produce a usable game asset. You can explore our guide on https://www.ai-media-studio.com/tools/pixel-art-style to see more examples of how these different keywords totally change the final look.
A great prompt doesn't just describe what you want—it also describes what you don't want. This is where negative prompts become your most powerful tool for achieving an authentic pixel art feel.
The Power of Negative Prompts
Sometimes, the AI tries to be a little too helpful. It might add soft shading, anti-aliasing (which creates blurry edges), or way too many colors, completely ruining the clean, crisp aesthetic that defines pixel art. A negative prompt is your way of telling the generator what to avoid.
For instance, you could add these keywords to your negative prompt field:
--no blurry, soft edges, gradients, photorealistic, 3d
By explicitly forbidding these elements, you force the AI to stick to the hard lines and limited color schemes that make pixel art what it is. To really get the most out of any AI generator, you have to get comfortable with prompt engineering. This skill is universal, and resources for mastering prompt engineering with ChatGPT translate directly to creating superior images, no matter which tool you're using.
Refining and Upscaling Your AI Pixel Art
Getting that first image out of an AI pixel art generator is a great feeling, but the raw output usually isn't the finished product. More often than not, it needs a bit of polish to look truly professional.
AI models can sometimes leave behind little tells—stray pixels that break a clean line, muddy shapes that aren't quite defined, or colors that bleed together. Think of this as the post-production phase. A little cleanup here makes a world of difference.
Your first job is to play detective and hunt for these common AI artifacts. Zoom in and look closely. Do you see any pixels that just feel... wrong? Or maybe a cluster of colors that looks more like a mistake than an intentional choice? These tiny flaws can easily disrupt the clean, deliberate look that makes pixel art so great.
Many generators have some basic editing tools built right in, which are handy for quick fixes. But for real control, I always recommend exporting your art to a dedicated pixel art editor like Aseprite or Piskel. These apps are built from the ground up for this kind of work, giving you the precision you need to fix every last pixel by hand.
How to Upscale Without Ruining Your Art
Once your art is cleaned up, you’ll probably need to make it bigger. This is where upscaling comes in, but it’s a process that can instantly destroy good pixel art if you’re not careful.
Using a standard resizing tool, like the one in Photoshop, is a huge mistake. These tools use algorithms that try to blend pixels together, resulting in a blurry, smudged mess. It completely kills the sharp, crisp aesthetic you're going for.
The right way to do it is with integer scaling. This technique multiplies your image's size by a whole number (2x, 3x, 4x, etc.), making sure every single pixel becomes a perfect block of new pixels. A 2x scale, for example, turns one pixel into a 2x2 square of four identical ones. This is how you keep those sharp edges and that authentic retro vibe.
Key Takeaway: Never, ever use standard "bicubic" or "bilinear" resampling on pixel art. You need an algorithm like "Nearest Neighbor" or a tool that specializes in integer scaling to preserve the integrity of your work.
Properly resizing your art is what makes it usable for a game, a website, or a high-quality print. If you want to get into the technical nitty-gritty, you can learn more about upscaling and why it's so critical in our detailed guide.
The Final Polish
After you’ve upscaled, give your art one last look. Seeing it at a larger size can reveal tiny imperfections you might have missed earlier. This is your last chance to make any final tweaks.
This two-step workflow—clean up first, then upscale correctly—is what separates amateur-hour results from polished, game-ready assets. By paying attention to these details after the AI has done its part, you ensure your creations look intentional, professional, and ready for whatever you have planned.
Creating and Exporting Game-Ready Sprite Sheets
Once you've nailed down your core character design, the real magic begins: bringing it to life with animation. This is a non-negotiable step for game developers, turning a cool static image into a living, breathing asset. A pixel art generator is an absolute workhorse here, letting you churn out consistent animation frames for actions like walking, jumping, or attacking.
The entire game is about maintaining visual consistency from one frame to the next. You'll start with your original character prompt but layer on specific action modifiers. This simple trick ensures the core design—like your character's armor color or that unique helmet—stays locked in while only the pose changes.
Prompting for Animation Frames
Let's say your base prompt is something like: 16-bit space marine, green armor, red visor, holding a plasma rifle, side view. To build out a simple walk cycle, you’d generate a whole series of images by just tweaking the end of that prompt.
It might look something like this:
...walking animation, frame 1, leg forward...walking animation, frame 2, passing pose...walking animation, frame 3, leg back
By keeping the main description identical and only swapping out the action phrase, you're essentially directing the AI to produce a cohesive set of sprites. This is how you transform standalone pictures into the fundamental building blocks of fluid animation—an essential skill when making AI images for game development.
Assembling Your Sprite Sheet
After you've generated all your individual frames, you need to stitch them together into a sprite sheet. Think of it as a single image file that holds all your animation frames, neatly arranged in a grid. Game engines like Unity or Godot are built to read these sheets and play back the animation super efficiently.
For this part, you'll need a dedicated pixel art editor like Aseprite. The process itself is pretty straightforward:
- Set Up Your Canvas: First, do a little math. If each of your sprites is 32x32 pixels and you have four frames for an animation, you'll need a canvas that's 128x32 pixels.
- Import and Align: Bring in each generated frame and place them right next to each other on your new canvas. The key is making sure they are all perfectly aligned on the same horizontal line.
- Add Padding (Optional but Recommended): Some game engines can get a little confused if sprites are touching. Adding a small margin of one or two pixels between each frame can prevent visual artifacts or "bleeding." Always a good idea to check your engine's documentation on this.
This infographic breaks down the workflow, showing how you get from a raw AI concept to a polished, ready-to-use game asset.
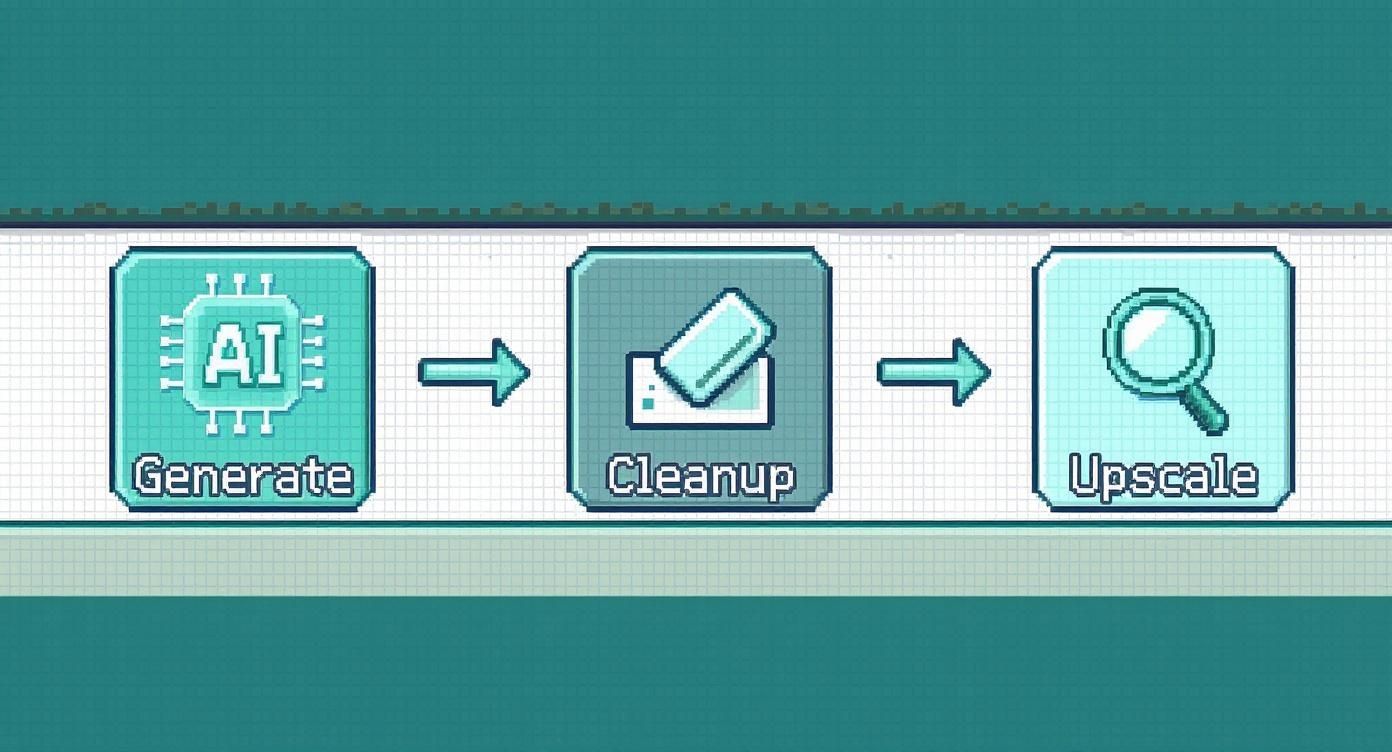
It’s a great reminder that AI generation is just the first step. The real professional touch comes from the cleanup and upscaling you do afterward.
Once everything is arranged perfectly, just export the entire canvas as a single PNG file. That's it. Your sprite sheet is now a game-ready asset, ready to be dropped right into your project.
Remember, precision is everything. I can't stress this enough. Even a one-pixel misalignment between your frames will create a noticeable jitter or hop in the final animation. Use your editor’s grid and snapping tools religiously to get perfect placement.
Following this methodical approach ensures your AI-generated art isn't just a collection of cool pictures, but fully functional, dynamic components for your game or interactive project.
Common Pixel Art Generator Mistakes (And How to Fix Them)
Even the most powerful pixel art generator can feel like it has a mind of its own. You’ll meticulously craft a prompt asking for a simple four-color palette, and the AI will hand you back a full-blown rainbow. It's frustrating, but understanding why it happens is the key to getting the results you want without wasting hours on re-rolls.
More often than not, the AI is just getting mixed signals from your prompt. If you ask for a "photorealistic knight, 4-color palette," the AI latches onto "photorealistic" and completely ignores your color constraint because realism requires a ton of colors. The fix is to be firm. Lead with your most important style keywords and use negative prompts to weed out anything that adds unwanted complexity.
Getting Outputs That Are Too Detailed or Muddy
Another classic problem is getting an image that’s just too detailed to pass as authentic pixel art. The AI might try to be helpful by adding soft shading or anti-aliasing, which just leaves you with a blurry, "painterly" mess. This is where negative prompts become your absolute best friend.
To force the AI back to the crisp, clean aesthetic we're after, you need to explicitly forbid those softer effects. Try adding these to your negative prompt field:
--no blurry edges--no gradients--no soft shading
This one simple tweak tells the AI to stick to the hard lines and flat colors that really define great pixel art.
Pro Tip: Found a generation you absolutely love? Don't let that perfect style go to waste. Feed that image back into the AI as a style reference for your next batch of prompts. Most modern tools have an image-to-image feature, and it's easily the best way to keep your style consistent across a whole set of game assets.
Got Questions About Pixel Art Generators? We’ve Got Answers.
Jumping into AI art generation always kicks up a few questions. We see the same ones pop up all the time, so we've put together this quick guide to give you clear, straightforward answers. Think of it as your cheat sheet for mastering these awesome creative tools.
Can I Make Animated GIFs Directly with a Pixel Art Generator?
Not directly, but they are an absolutely crucial part of the process. Most generators focus on creating incredible static images, which you then use as the building blocks for animation.
The standard workflow involves generating each frame of your animation one by one. You'd prompt something like walk cycle frame 1, then walk cycle frame 2, and so on. Once you have all your frames, you’ll use a dedicated pixel art tool like Aseprite or the free-to-use Piskel to stitch them together into a smooth GIF. The AI's real magic here is keeping the style perfectly consistent from one frame to the next.
How Do I Keep My Character's Design Consistent Across Different Images?
Consistency is the name of the game, especially if you're creating assets for a project like a video game. The trick is to be incredibly specific and a little repetitive with your prompts. If your generator has a seed number feature, use it! Locking in a seed is the best way to produce slight variations of the same core character design.
For every new image or pose, you have to remind the AI of the character's most important features. Don't assume it remembers anything. For example:
knight with red plume on helmet, silver armor, blue cape, idle poseknight with red plume on helmet, silver armor, blue cape, jumping pose
Your starting prompt is your anchor. A strong, descriptive base prompt is the key to consistency. You have to repeat those core details every single time.
What's the Real Difference Between 8-Bit and 16-Bit Styles?
When you're writing prompts, these terms are shorthand for setting the art's complexity and vibe.
8-bit points the AI toward a very retro style. Think super low resolutions (like 16x16 pixels), a heavily restricted color palette, and simple sprites, just like you’d see on the earliest home consoles.
On the other hand, 16-bit signals a leap forward in detail. It implies higher resolutions (like 32x32 or 64x64), a much richer and more expansive color palette, and more complex sprites with actual shading and detail—much closer to what you'd find on a SNES or Sega Genesis.
Ready to stop troubleshooting and start creating? AI Media Studio provides over 50 distinct art styles, including dedicated pixel art models that deliver clean, consistent results every time. Generate your first pixel art masterpiece for free today.