Want to create incredible images with AI? It’s surprisingly straightforward: you describe the visual you want in plain text, and an AI model brings it to life in seconds. This whole process, known as text-to-image generation, has blown the doors wide open for creativity, letting anyone produce professional-quality visuals without needing a design degree.
This guide will walk you through the practical, real-world steps to get the most out of this powerful technology.
The New Era of Visual Content Creation

Let's be honest—creating custom visuals used to be a massive headache. It meant shelling out for expensive software, spending years learning the ropes, or waiting forever on a professional designer. For marketers, creators, and entrepreneurs, that usually meant settling for subpar content or blowing the budget.
AI image generation has completely flipped the script. Tools like AI Media Studio now empower anyone to produce stunning, on-brand images in minutes, not days. The impact is immediate, giving you a mix of speed, affordability, and creative control that was just a dream for most people a few years ago.
Why This Shift Matters
This isn't just about making pretty pictures faster. It's a fundamental change in how we create content. Instead of endlessly scrolling through stock photo sites for a "good enough" image that thousands of others are already using, you can create the exact visual your project demands. This is quickly becoming an essential skill for anyone working in digital media.
The market growth tells the same story. Valued at USD 418.5 million, the AI image generator market is expected to explode to USD 2,633.2 million by 2035. That’s a compound annual growth rate of 18.2%, showing just how essential these tools are becoming in fields like advertising and media. You can find more insights on generative AI market growth on metatechinsights.com.
The real magic of AI image generation is its ability to turn a simple idea into a polished visual asset. It’s making design accessible to everyone, putting professional-level creative tools directly into the hands of the people who need them most.
What You Can Expect to Learn
Forget the technical jargon. This guide is all about practical, hands-on advice you can use today to turn your concepts into compelling visuals. We'll cover how to:
- Choose the right platform based on what you actually need, from style libraries to commercial licensing.
- Write effective prompts that tell the AI exactly what you want, giving you predictable, high-quality results.
- Refine your creations with advanced tools like inpainting and outpainting for those pixel-perfect adjustments.
- Prepare your final images for professional use, covering everything from resolution to file formats.
By the end, you'll have a clear roadmap for plugging AI image generation into your workflow, saving you time and seriously leveling up your brand’s visual identity.
Finding the Right AI Image Generator for Your Needs
Diving into AI image generation can feel like walking into a crowded room where everyone is shouting. There are countless tools out there, all promising incredible, mind-blowing results. But here's the thing: not all of them are created equal. The platform you choose will have a massive impact on the quality of your images, how easy they are to create, and whether you can even legally use them for your business.
The trick is to look past the flashy demos and focus on what actually matters for professional work. First and foremost, the interface has to be intuitive. You shouldn't need a degree in prompt engineering to get started; the process should feel creative and fluid, not like you're debugging code. A clean, straightforward platform lets you concentrate on your vision, not on fighting with confusing sliders and settings.
Differentiating Toys from Tools
Lots of free or basic AI generators are fun to play with, but they just don't cut it for business. A professional-grade tool gives you a much deeper level of control and, just as importantly, reliability. This is where features like a rich style library become absolutely essential.
Look for a platform that gives you a ton of artistic options right out of the box. Can you easily switch between styles like:
- Photorealistic for creating authentic-looking product mockups or lifestyle shots?
- Vector illustration for crisp, scalable icons and web graphics?
- Watercolor or oil painting for more artistic blog headers or social media posts?
This kind of versatility means the tool can adapt to whatever project you throw at it, whether it's a high-stakes ad campaign or a simple presentation graphic. A powerful platform like the AI Image Generator from AI Media Studio is built with this flexibility in mind, offering dozens of styles to match your brand's unique vibe.
Advanced Features and Commercial Rights
Beyond just turning text into a picture, you need to look for advanced editing tools. Features like inpainting (where you can change a specific part of an image) and outpainting (extending the canvas of an image) are absolute game-changers. They let you fix imperfect results, add new details, or change an image's dimensions without having to start over from scratch.
This level of sophistication is fueled by some serious cash. Private investment in generative AI recently soared to USD 33.9 billion globally, with enterprises adding another USD 37 billion to the pot. That money is what funds the development of these advanced editing features and high-resolution outputs, turning these platforms into robust professional workshops.
But here’s the most critical piece of the puzzle for any business: licensing. If you plan to use an image for any commercial purpose—on your website, in an ad, on a t-shirt—you need explicit commercial use rights. Many free tools come with restrictive licenses that could expose your business to some serious legal trouble down the road.
Always, always choose a platform that clearly grants you a commercial license for the images you create. It's a non-negotiable safeguard that protects both your work and your brand. As you explore the possibilities, it's worth understanding the technology behind these generators by checking out some of the top AI image models available today.
Ultimately, the right tool is a perfect blend of a simple interface, a diverse style library, powerful editing features, and—most importantly—the proper licensing to back up your business goals.
Crafting Prompts That Get Amazing Results
The secret to jaw-dropping AI images isn't some kind of digital magic—it's all in the prompt. This is where you stop being a user and start being an art director, guiding the AI to create exactly what’s in your head. Honestly, learning how to write a good prompt is the single most important skill you can develop for creating professional, on-brand AI images every single time.
Think of the AI as an incredibly talented artist who takes everything you say literally. If you mumble, "a team working," you'll get a bland, forgettable picture of people around a table. But if you give clear, specific instructions, you can direct that artist to create a masterpiece. It's all about communicating your vision with precision.
The Anatomy of a Powerful Prompt
A great prompt is more than a jumble of keywords; it’s a structured brief. After countless hours of generating images, I’ve found a simple formula that works wonders for getting predictable, high-quality results. It breaks down into four key components you can layer together to build a comprehensive set of instructions for the AI.
Let's break down this structure:
- Subject: This is the "who" or "what" of your image. Don't be shy with the details. Instead of just "a dog," try "a happy golden retriever puppy." The more specific you are here, the better the AI can visualize your main character or object.
- Action & Context: This is the "doing what" and "where." What is your subject up to, and what’s the setting? Instead of "in an office," describe the whole scene: "collaborating around a modern glass conference table in a sunlit office with large windows overlooking a city skyline."
- Artistic Details: This is where you put on your art director hat. Define the style, lighting, and camera work. Use terms like "photorealistic," "cinematic lighting," "shot on a DSLR camera with a shallow depth of field," or "vibrant watercolor illustration."
- Mood & Atmosphere: Finally, set the emotional tone. How should the image feel? Use descriptive words like "optimistic and energetic," "serene and peaceful," or "dramatic and moody." This helps the AI capture the emotional core of the scene you're imagining.
By layering these elements, you move from a vague idea to a concrete, detailed brief. This structure minimizes ambiguity and dramatically increases your chances of getting the perfect image on the first or second try, saving you time and generation credits.
From Vague Idea to Perfect Image
Let's put this formula into action with a real-world marketing scenario. Say you need a header image for a blog post about remote team collaboration.
Vague Prompt: a team working together
That’s a start, but it leaves way too much up to the AI's imagination. You’ll likely get a dull, generic image that feels like a stock photo from a decade ago and doesn't match your brand at all.
Now, let's build a much better prompt using our formula.
Detailed Prompt: A diverse team of three young professionals collaborating on a project via laptops, smiling, sitting at a rustic wooden table in a bright, modern co-working space with green plants in the background, soft natural light from a window, photorealistic style, warm and inviting atmosphere, shot with a 50mm lens.
See the difference? This detailed version tells the AI everything it needs to know. It specifies the number of people, their actions, the environment, the lighting, the exact camera style, and the overall mood. The result will be a unique, on-brand visual that looks like it was created just for you, not pulled from some generic library. To take your prompt creation to the next level, exploring some of the top AI brainstorming tools can be a huge help in generating creative and detailed descriptions.
The Power of Negative Prompts
Telling the AI what you want is only half the battle. Telling it what you don't want is just as important. That's where negative prompts come in.
These are keywords or phrases that instruct the model to avoid certain elements, styles, or common flaws. AI models can sometimes produce weird results—distorted hands, extra limbs, or blurry faces are common culprits. A negative prompt is your quality control tool.
Here are some go-to negative prompts I use all the time:
- For Anatomy:
deformed hands, extra fingers, mutated, disfigured, poorly drawn hands - For Quality:
blurry, grainy, low-resolution, out of frame, watermark, signature, text - For Style:
cartoon, anime, ugly, oversaturated, bad art, amateur
For our marketing image example, a solid negative prompt would be: blurry background, generic, stock photo, poorly drawn faces, text, watermark. Adding this helps ensure the final image is clean, professional, and free of any distracting errors.
This infographic breaks down the simple flow for choosing the right AI tool, which is just as important as writing the prompt itself. It covers features, legal rights, and what to look for in the user interface.
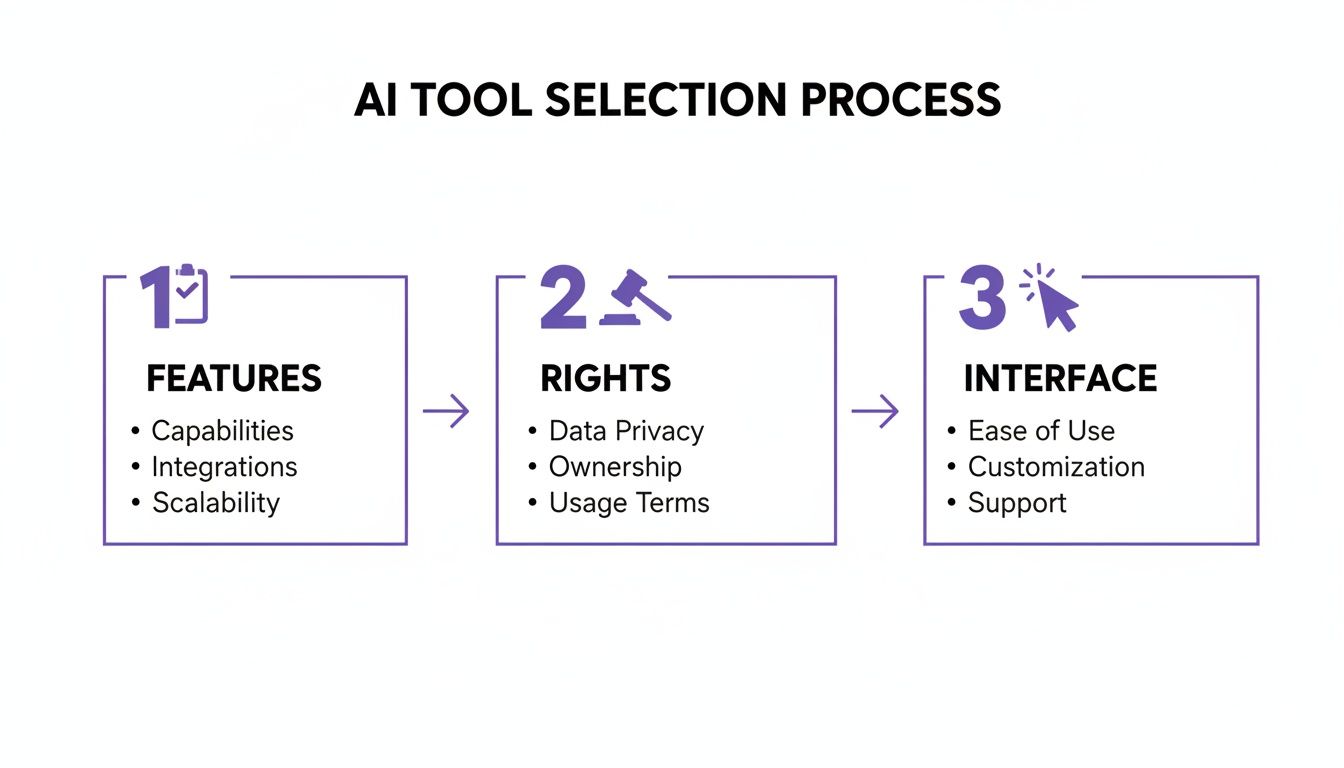
The image drives home a key point: a great outcome isn't just about a great prompt. It starts with choosing a tool that has the right features and, crucially, gives you the legal permissions you need from the very beginning.
Using Styles and Advanced Tools to Refine Your Vision
A great prompt gets you about 90% of the way to a perfect image. The final 10%—the magic that turns a good output into a professional-grade asset—comes from styles and advanced editing tools. This is where you move beyond simply generating an idea and start refining it with an artist’s precision.
Think of it like cooking. Your prompt is the recipe, but applying a style is like choosing your cooking method. Grilling, baking, or frying will give you wildly different results from the same set of ingredients. In the world of AI, styles are predefined artistic models that can instantly shift the mood, texture, and entire story of your image.
The Impact of Choosing the Right Style
Switching styles is one of the fastest ways to explore different creative directions without having to completely rework your prompt. With a single click, you can take a scene from a gritty, realistic photograph and turn it into a whimsical watercolor painting or a sleek, futuristic 3D model.
This is incredibly powerful for maintaining brand consistency or just tailoring visuals for different platforms.
For instance, a simple prompt for a "coffee cup on a desk" can be rendered in countless ways:
- Photorealistic: Perfect for a product shot on an e-commerce site, making the item look tangible and real.
- Vector Illustration: Creates a clean, modern icon for your website or a slide deck.
- Cyberpunk: Gives you a high-tech, neon-drenched aesthetic for a targeted social media campaign.
Professional platforms offer a huge menu of options. For a deeper dive into what's possible, exploring a comprehensive list of AI art styles can give you a better sense of the creative potential you have at your fingertips.
The right style does more than change the look; it changes the story. A photorealistic image says, "This is real," while an anime-style image says, "This is imaginative." Choosing a style is a strategic decision that aligns the visual with your message.
Going Beyond Generation With Inpainting
Even with the best prompt and style, sometimes the AI serves up a small imperfection. Maybe there's a weird object in the background you want gone, or a character’s expression isn't quite right. In the past, this meant starting over and rolling the dice again. Today, we have inpainting.
Inpainting lets you select a specific area of your generated image and tell the AI to regenerate only that part. It’s like having a magic eraser that can intelligently fill in the blanks according to your new instructions.
Here’s a practical scenario for a marketer: You generate a fantastic lifestyle image of someone working at a café, but the coffee cup on the table is generic. Using inpainting, you can simply draw a mask over that cup and add a new prompt like, “a coffee cup with our company logo.” The AI will seamlessly swap in your branded cup, instantly creating a custom marketing asset.
Expanding Your Canvas With Outpainting
Just as inpainting lets you edit what’s inside the image, outpainting lets you expand what’s outside of it. This tool intelligently extends the borders of your image, filling in the new space with content that perfectly matches the existing scene. It's a total game-changer for repurposing content.
Imagine you’ve created a perfect square image for your Instagram feed. Now, you need a wide banner version for your website header. Instead of awkwardly cropping the square or starting from scratch, outpainting is your solution.
You can use it to:
- Extend the image horizontally to create a stunning panoramic landscape.
- Add more vertical space to turn a tight portrait into a full-body shot.
- Change the aspect ratio from 1:1 to 16:9 for a YouTube thumbnail.
The AI analyzes the existing pixels—the lighting, textures, and objects—and continues the scene naturally. This feature gives you immense flexibility, allowing one core visual to be adapted for multiple formats without losing quality or context.
The bottom line is that modern tools let you do so much more than just basic text-to-image generation. Mastering styles, inpainting, and outpainting is what separates casual users from creators who can consistently produce pixel-perfect, on-brand visuals for any need. These advanced features are your toolkit for achieving total creative control.
Preparing Your AI Art for Professional Use
You’ve done it. You wrestled with prompts, tweaked the settings, and finally generated an image that perfectly captures your vision. But hitting "generate" isn't the finish line.
The final steps you take before that image sees the light of day are what separate a cool AI experiment from a professional visual asset ready for a marketing campaign. This is all about the final polish—making sure your creation meets the technical and legal standards for real-world use.
Mastering Resolution and Upscaling
The first hurdle is almost always resolution. Most AI image generators create their initial outputs at a modest size, like 1024x1024 pixels. That's fine for a quick preview, but it will look blurry and pixelated if you try to stretch it across a blog header or send it to a printer.
This is where upscaling is non-negotiable. Modern upscaling tools use AI to intelligently increase an image's resolution, often by 2x or 4x, without that fuzzy, stretched-out look. Instead of just making pixels bigger, these tools add new detail, preserving the sharpness and integrity of your original artwork.
Your goal is simple: make the image look just as crisp on a giant monitor as it does on a smartphone. Always upscale your final picks before you even think about exporting them. It will save you a world of quality-control headaches later.
Choosing the Right File Format
Once your image is the right size, you need to save it in the right file type. For almost all digital work, this comes down to two choices: JPEG or PNG. Which one you pick depends entirely on how the image will be used.
Here’s the simple breakdown:
- JPEG (Joint Photographic Experts Group): This is your workhorse for most photographic images. JPEGs use smart compression to keep file sizes small, which is critical for fast-loading websites. Use it for complex, colorful images like realistic photos or detailed illustrations.
- PNG (Portable Network Graphics): The superpower of PNGs is transparency. If your image needs a transparent background—think logos, icons, or product cutouts that you want to place on top of other content—PNG is your only real choice. The files are a bit larger, but the quality is lossless.
For making these kinds of pixel-perfect adjustments, an integrated tool can be a lifesaver. You can use a dedicated AI image editor to handle final touches like these without having to jump between different apps.
Demystifying Licensing and Commercial Use
This part is critical. Just because you created an image with an AI tool doesn't automatically mean you have the right to use it for your business. That right is granted by a commercial use license, and ignoring it is a huge risk.
Always use a platform that provides clear, unambiguous commercial rights. For instance, the paid plans at AI Media Studio give you the freedom to use your creations in marketing materials, on products you sell, and in ads without looking over your shoulder. Free or personal-use-only tools often come with restrictive licenses that could put your business in legal hot water.
Seriously, take five minutes to read the terms of service. It’s the best way to protect your work and your brand.
Workflow Hacks for Efficiency
Finally, let's talk about working smarter. When you need a whole set of visuals for a campaign or a website, generating them one by one is painfully slow and can lead to inconsistent results.
This is where batch generation becomes your best friend.
Batching allows you to run the same core prompt with slight variations over and over, quickly producing a whole series of on-brand images. Imagine creating five different hero images for a landing page, all in the same style, with a single command. It saves an incredible amount of time and ensures your visuals have a cohesive look and feel. This method is a core strategy for anyone needing to scale up their content creation.
Got Questions About Creating Images With AI?
As you start playing around with AI image generators, a few questions are bound to pop up. The tech is moving fast, and getting a handle on the practical details—from legal rights to keeping your art consistent—is the key to making these tools really work for you. Here are some straightforward answers to the questions we hear most often.
Can I Legally Use AI-Generated Images for My Business?
Yes, but this is the single most important detail to get right. Your ability to use an AI-generated image for commercial purposes depends entirely on the terms of service of the platform you're using.
A lot of the free or experimental tools come with restrictive licenses that flat-out forbid commercial use. Slapping an image from one of those onto your website could land you in hot water over copyright. On the other hand, reputable, professional platforms offer paid plans that grant full commercial use rights. That means you can confidently use your creations in marketing, ads, and even on products you sell.
Why Do My AI Images Sometimes Have Strange Hands or Faces?
Ah, the classic AI quirk. This is a well-known hiccup in many current models. While they’re brilliant at piecing together images from massive datasets, they can still get tripped up by the super-complex details of human anatomy, especially hands and faces.
The best way to fight this is with negative prompts. Specifically telling the AI to avoid things like extra fingers, deformed hands, poorly drawn faces can clean up your results dramatically. If a few stubborn errors still slip through, an inpainting tool is your best friend. It lets you select just the messed-up area and regenerate it until it looks perfect.
This is one of those problems that's quickly disappearing as the technology gets better. Newer models are much more skilled at rendering realistic details, but for now, mastering negative prompts and inpainting is a vital skill for getting professional results.
How Can I Keep My AI Images On-Brand?
Maintaining a consistent look and feel is everything for a brand. The trick is to create a simple "prompt style guide" for yourself that you can pull from every time you generate an image.
Your guide should spell out the core visual elements that define your brand. Think about things like:
- Color Palette: Weave phrases like
using a brand palette of navy blue and warm golddirectly into your prompts. - Lighting Style: Set the mood with specific terms like
soft natural morning lightordramatic studio lighting. - Overall Vibe: Define the feeling you're going for, like
clean and minimalist aestheticorenergetic and optimistic vibe.
By reusing these key descriptors over and over, you effectively train the AI to produce visuals that feel cohesive and are instantly recognizable as yours. Some advanced tools also let you use a specific "seed" number to generate a whole series of images with nearly identical compositions and styles.
Is It Better to Use a Simple or a Detailed Prompt?
This really comes down to what you’re trying to do. A simple, wide-open prompt like a dog on a hill is fantastic for brainstorming. It gives the AI maximum creative freedom, which can spark some truly unexpected and inspiring ideas you might not have come up with on your own.
But for professional work where you need a specific outcome, a detailed prompt is almost always better. It cuts out the guesswork and puts you in the director's chair.
Just look at the difference:
- Simple:
a robot working - Detailed:
Photorealistic, friendly robot assistant organizing files in a bright, modern office, cinematic lighting, shot on a DSLR with a shallow depth of field, optimistic mood
The detailed version gives the AI precise instructions, making sure the final image fits perfectly with your vision for that marketing campaign or website banner.
Ready to move beyond questions and start creating? AI Media Studio gives you all the tools you need—from advanced editing features to a full commercial license—to generate stunning, on-brand visuals in seconds. Start creating for free today at https://www.ai-media-studio.com.